
 When designing our home I had my heart set on a curved island wall. My husband did not! He kept avoiding the wall thinking I'd change my mind. Finally, when the time came he caved and started framing it out, cursing me under his breath I'm sure all the while. We had a few issues when it came pour time, but all in all we both love the end result.
My love affair with concrete prompted me to add a new postcard to my Cheat Sheet Postcard Series, a collection of postcards to collect and reference on a variety of topics. For your free Subscription to the series, click here: 10 Ways to Decorate Your Home with Concrete.
First things first, he built a support wall in the basement (which will be part of a closet someday when it gets finished). Then, he started my island. Wow, was this a fun project. See those pieces of rebar sticking out the backside? That's my bar-top, eventually anyhow.
The framing was made using Melamine 4x8 sheets with 2x4 supports screwed on every 12" or so. Using small blocks screwed into the floor at the base to hold it in place and kickers to keep the top plumb. Then he added all the rebar (which is bolted to the floor in spots and also comes out at the top for the future bar-top). It's not pictured here but the inner framing is done the same way as the outer.
The framing was made using Melamine 4x8 sheets with 2x4 supports screwed on every 12" or so. Using small blocks screwed into the floor at the base to hold it in place and kickers to keep the top plumb. Then he added all the rebar (which is bolted to the floor in spots and also comes out at the top for the future bar-top). It's not pictured here but the inner framing is done the same way as the outer.

FYI- that's not enough kickers! Pour time was a mess. He was adding kickers as we went. Better to go way overboard than not have enough, trust me on that one!

Pour day. My sons (this is my oldest, 8th grader at the time) and that's me. My hubby and the boys mixed in the garage and I shoveled into the wall framing. If memory serves I shoveled 18 bags into that wall. It was an exhausting day. We used regular Quikcrete from the hardware store, no special mix for this project.

Here is how it came out of the forms. One of the things I love about concrete (and probably what others hate) is you never know what you're going to get. I love the surprise. We added black colorant to the concrete, I really wanted a "landscape" picture with varying degrees from black into gray. You can kind of see it but NOT! My husband wanted to tear it out and try again. Me- no way! I shoveled 18 bags of concrete into that wall, we'll make it work! So, how are we going to do that?

Our solution- we sanded, and sanded, and sanded some more using a wet sander. Yes, we made a huge mess. I had black dust all over the ceiling (which I had to re-paint), we covered everything else with plastic. The floors (which were already in by now) had the black paper with a layer of plastic over the top and I was using a wet vac to try and keep it dry (it worked pretty good). Next step was to frame up the bar and the island top, it would be poured in place. The rest of the countertops we poured in the basement on the floor and brought them up for install, but that's a story for another day.

Here it is finished. Tear it out! He must be crazy! It worked out. We both really love the finished product.
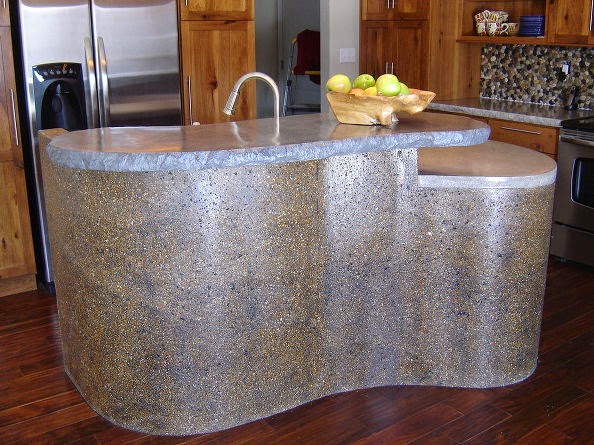
Is it for everyone, nope! Will I ever tire of it? Maybe, it's been eight years and I haven't yet but I might someday. There's lots of artsy-fartsy things I can do if that day ever comes. For now, I'm pleased as punch, still lovin' it.
Have you done any creative work with concrete? I'm always surprised and totally inspired by the creative uses people come up with for concrete. I've added a new postcard to my Cheat Sheet Postcard Series, a collection of postcards to collect and reference on a variety of topics. For your free Subscription to the series, click here: 10 Ways to Decorate Your Home with Concrete.


Wow, that is amazing! I don't think I could accomplish something like that. The finished product looks just great.
ReplyDeleteThank you, Jamie. There is some building know-how in order to figure out your templates and framing but otherwise there's nothing to it. I have another project I'll share in a couple days that's a little smaller scale. We used a different technique but you could do this same thing with it.
ReplyDeleteOne of the things I really love about concrete, lots of trial and error with "make it work" moments. Great fun!
How the heck did you get in up to your kitchen? Or was this poured in place?
ReplyDeleteIt was poured in place. I ended up shoveling about 18 bags of concrete into the wall framing. It's also bolted to the floor to help keep it from ever tipping with support walls underneath. We did pour the countertops along the outer cabinets in the basement. Those were fun to carry up and get set in place.
DeleteThis is really a nice and informative, containing all information and also has a great impact on the new technology. Thanks for sharing it, concrete contractors york pa
ReplyDelete