Showing posts with label Tutorials. Show all posts

Wednesday, May 25, 2016

How to Easily Turn A Tin into Multiple Pieces of Jewelry

I am a hoarder of beautiful tins, I admit it, I can't pass them up.  Many times they're not usable for my purposes but they're beautiful so I must have them.  This particular tin I have found a couple times and it's perfect!  Wait till you see how many projects I've made so far and there's still plenty left to work with.

I forgot to take a picture of the tin before I started cutting but look at all those lovely pieces I have to work with.

I decided to make a bracelet and earring set for my first project.  I'd love to teach a class at the new shop for this, so easy and you leave with completed jewelry.

I started by cutting down my pieces so they are a better fit on the wrist.  I used the block to hammer them relatively flat (when cutting them up they tend to get bent in the corners, amongst other things).

I used a file to sand down any rough edges and round the corners.  Then, using canned food I hammered each piece giving it a slightly rounded finish, you can see what I mean in the next picture.


I marked the pieces where I wanted the eyelets and started punching holes with my crop-a-dile, love that thing....

 ... and added my eyelets.

Using four of my matching tin pieces I linked them together.   I haven't added the closure yet, I started to make one but the wire just wasn't sturdy enough for my liking so I need to get into Michael's sometime and pick one up.  Also, if I'm teaching this for a class we will have limited time, making closures might not be an option, especially if we're making earrings too.

Of course we are.  Again I used ear wires from Michael's that match the wire and eyelets, making the earrings a really easy project.  Simply prep the smaller pieces of tin with a little sanding, mark and punch your hole and attach your ear wire with a ring.  It's as easy as that and you've got yourself an adorable new bracelet and earring set.


Oh but why stop there?  You could continue on and add a necklace quite simply.  I used a different color piece from the same tin for this project.  Simply cut it out and make random hole punches around the outer edge.  I then took some wire and strung it through the holes, leaving a tail at the bottom on both sides.

I strung a few decorative beads sporadically throughout as well...

... and used the "tails" at the bottom to make a ring to add a little bling.

Another quick project for a class that requires very little jewelry making experience yet you leave with a beautiful pendant necklace that you made yourself.


Saturday, April 2, 2016

How To Make An Adorable Mini-Book Pendant From Tin

Mom and I headed to Bead N Button last June and had a great time.  We decided to skip classes and just shop, spending the nights playing in our hotel room.  Wow, did we ever have fun!

One of my goals was to learn a little about playing with tin in jewelry making.  Mom has done quite a few projects in the past, including this adorable book pendant, so she spent some time helping me learn the ropes.  Fun, fun.

Here's a look at our first project.


Tuesday, March 22, 2016

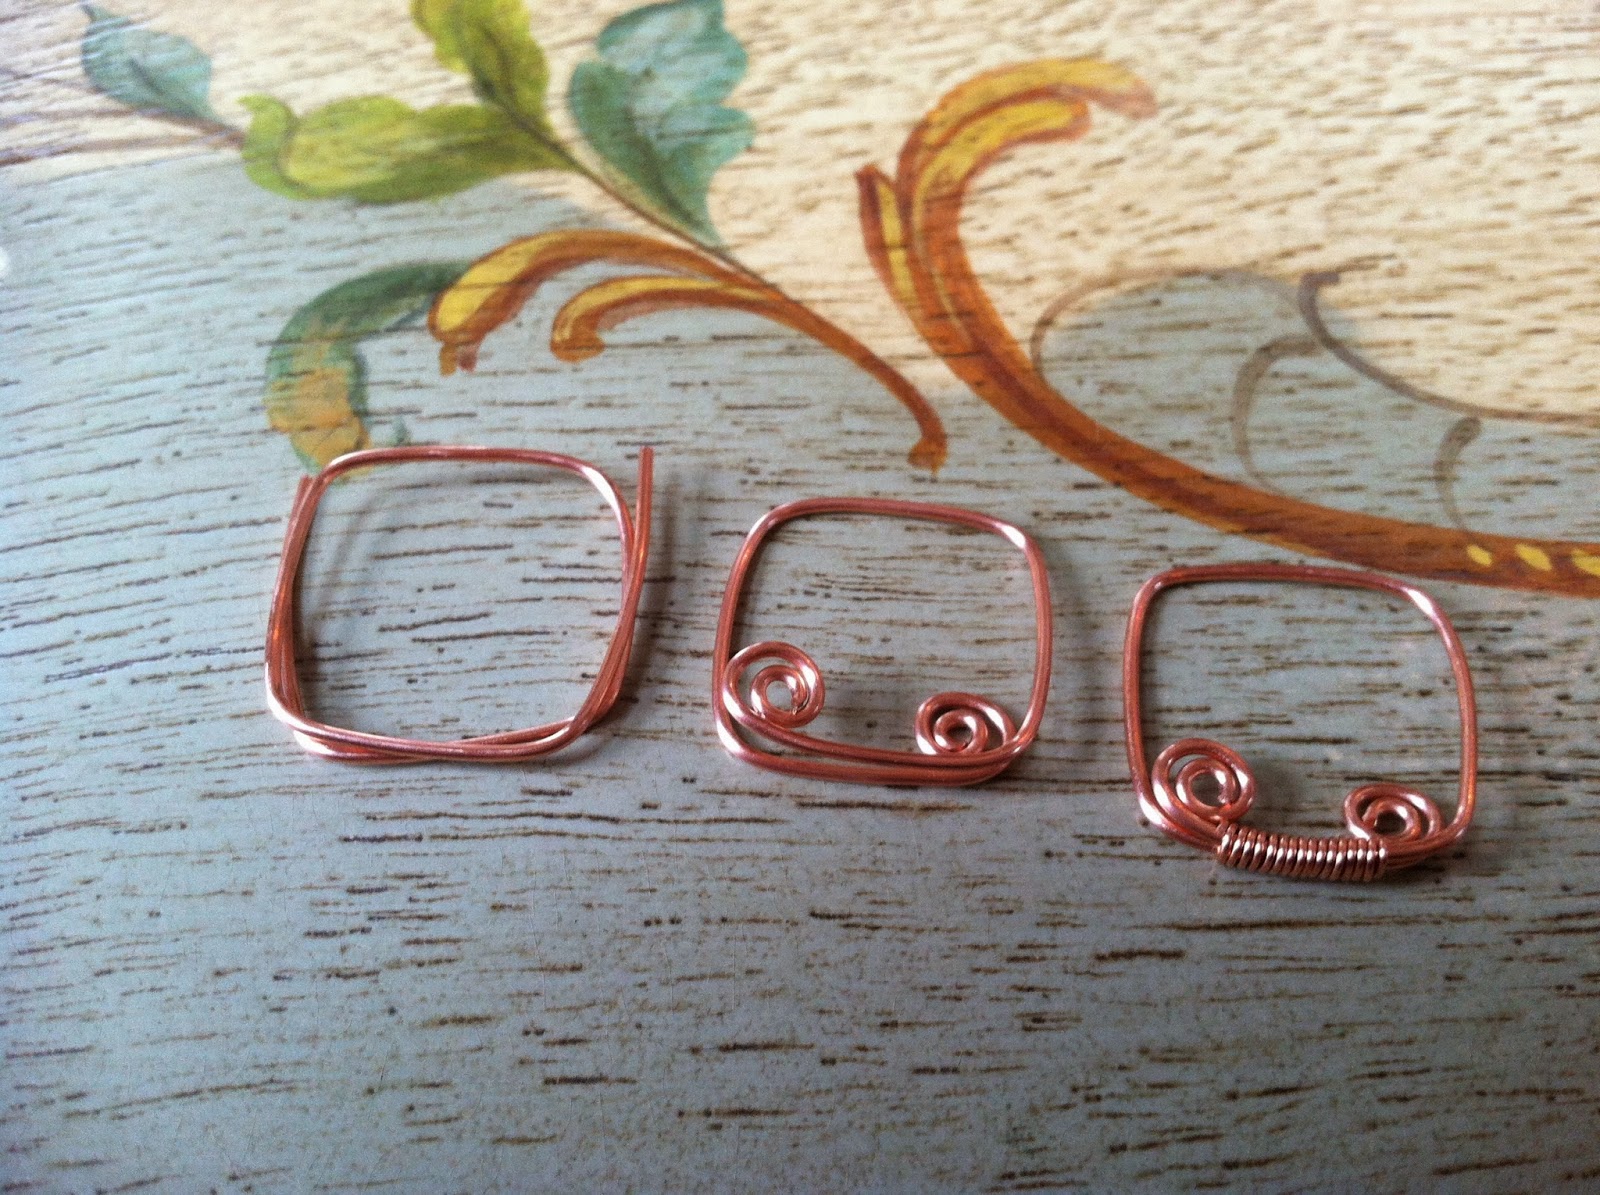
Tutorial- Square Wire Wrapped Jewelry Components

In this tutorial I would like to show you how to make this square jewelry component.  I used jump
rings as connectors but you could also connect the link however you plan to use it and then do the wrapping to secure it.

I used 18 gauge copper wire for my project cut into 5" pieces.  The handle of a screwdriver with the square shape I wanted was perfect as a mandrel.  Start with the wire at one edge and simply begin pushing the wire around the handle until you end up opposite the edge you started at (you will wrap around the handle 1-3/4 times).

Using round nose pliers grab one end of wire and begin forming a tight spiral....switch to chain-nose or coated pliers to continue forming the spiral.  I stopped the spiral slightly in from the corner.  Repeat on the other side. 


This is what you should have when both spirals are done.

This is where you would link it onto another piece before wrapping if you didn't want to use jump rings for connection.  Now, you need roughly 8" of 24 gauge wire to wrap.  Simply coil the 24 gauge wire between the spirals to secure the link.


Here is a picture of how I used the link:


Monday, March 14, 2016

How to Make an Animal Pendant Using Tin


While playing with tin, making little book pendants with mom, I started thinking of what else I could make.  For some reason a whale popped into my head but this can easily be converted into another design.                                                                                                                                 The first thing I did was draw my whale and his pieces.  I made the body, a fin and a tail.   I cut out the pieces and marked on the body where I wanted them to fit as well as the connection spots.


Using the paper templates I marked and cut the pieces out of tin, sanding the edges with a file.

Punch holes for connections.

Use rivets to make connections.

I used cardboard packaging as a spacer so I could leave a little room while riveting the tail so that it could move.  Turned out so cute.


I added an eye and an eyelet for hanging.

I wanted to decorate the back in some way so I used pattern paper.  It leaves a very sheer, tissue paper look allowing the gold color of the tin to shine through.  Really pretty and simple finish.

Now, how am I going to use it.  Haven't decided quite yet but it'll become part of a necklace someday.  I'm thinking of other animals that'll work; monkeys, birds, frogs, a butterfly?  What do you think would be cute?  

Friday, January 22, 2016

How I'm Making a Memory Journal From a Magazine - Part 1

A few years ago it became necessary to get my grandmother out of her home and into an environment where she had some company (full time), three meals a day and somebody helping to pay her bills and keep her from burning down the house, etc.  

That experience started me on my junkin' journey and a new business venture as well as, amazingly enough, helping to repair and heal some bad feelings I harbor towards grandma.  Not saying those are gone, because they're not, but helping her through this time of life has really helped me develop a fondness and a partial understanding of what makes (made, she's medicated now so wow! what a difference) her tick (not that I'll ever agree with some of her more abrasive personality traits, but it's always easier to move on when you have a better understanding of where someone's coming from).

Anyhoo....  let's move on shall we.  Grandma is still alive and kicking at 98.  Sweet (yes, I said sweet, meds where have you been all her life), happy and busy, busy busy!

When cleaning out her home, I really wish I'd known what I know now, I'd of kept a lot more of her paper, ephemera, that I just threw away.  I'm kicking myself now, what a waste!  One thing I did keep was this Horticulture magazine from 1974 with the mailing label on the back.  Love it!  

Monday, January 18, 2016

My First Envelope and Greeting Card Journal- Part 1

I found another inspiring video on you-tube showing how to make an envelope journal (here's the link:  Easy Envelope Journal).  What a cute idea.  I have a stash that's been in the shed for years, it's like it was meant to be!  

For this project you'll need six envelopes and their corresponding cards.  I used Rubber Cement for my glue (If I had it to do over I'd use Aileen's tacky glue or even double sided tape but I was too lazy to walk upstairs and get it).

Friday, January 15, 2016

My First Cereal Box Journal- Part 1- The Cover

This is my first attempt at making a junk journal using a cereal box for the cover.  I've watched a couple YouTube videos (thanks Mom) and was immediately inspired to give it a go.  I started by collecting all my leftover papers and emptying a cereal box.

To decide the size of my journal I simply folded my papers in half, then cut them in half again giving me what you see below:


Friday, November 13, 2015

How To Make A Fringed Memory Pillow

When we lost my grandfather a couple years ago I asked grandma to keep his clothes for me so I could make a quilt, now what to do with all the leftovers?  I decided pillows were the perfect solution.  I have enough material to make lots of pillows vs. only one more quilt.  Pillows it is!

Saturday, October 24, 2015

How To Make Your Own Hanging Light Orb

My husband made one of these last year on a whim and proceeded to fill our yard with six more last
winter.  We live in the country on a winding road, it makes me smile every time I turn the first corner and see the faint gleam of lights peeking thru the trees.  With each turn it becomes more clear what, and where the light is coming from.  Makes me smile every time.

Last night the lights were on when I got home, in honor of our first bon-fire of the year tonight, what an immediate "pick-me-up" as I turned into the drive.


The base is made from wire mesh used in concrete work that can be purchased by the roll at Home Depot/Lowe's (usually with the concrete mixes).  Be careful working with this stuff, it'll get you if you're not careful, it's very sharp and has a mind of its own. 
First, cut the wire mesh into 14' lengths, roughly 4" wide, our mesh is 4" square so one width, (these are large orbs, guessing roughly 5' in diameter, do your math, you know, the stuff we all said we'd never use, to change the sizing).  Don't worry, you're not alone, I had to look it up.  Here's a link to help if you're wanting to make varying sizes, Finding the Circumference of a Circle.   

Hint: have someone stand on the end as you unroll the mesh or it'll fling itself right back at ya'.  Once it's unrolled and cut to length flip it upside down to continue cutting.

You're going to lay your pieces out on the ground in a "star" crisscrossing each other in the center, evenly spaced using four strips and zip tie them together, that'll be the bottom of your orb.  Grab the other ends pulling them upward to form the top and zip tie them together to form the ball.  Hint: use a hanger of some sort as a second pair of hands to hold each strip as you pull it up.

To help them hold their shape use a straight piece of wire, form hooks on either end that'll grab the top and bottom, or zip tie to it,  and hold the ball in shape (so the bottom doesn't want to sag). 

Add your lights with little zip ties, hang it in the tree and grab your extension cord.  You're ready to light it up!


If you don't need them to be this large you can buy wire planters from your local hardware store, Cocoa Hanging Baskets, two per ball, and zip tie them together.  Add your lights and voila', you're done.  Just remember, you're limited in the size of a ball you can make.  With a little more time and effort you can customize them to your liking.

Either way you've got great new lights for your yard.


Wednesday, October 21, 2015

How To Make Your Own Beaded Napkin Rings

For years my mom has been trying to get me interesting in jewelry making, I have laughed and scoffed and then a couple years ago she finally won me over. I love the creative expression and the ability to create "wearable art". There is too much to do to justify spending too much time on it for now, but I have found ways to incorporate a passion for beading into usable, decorative items for the home.

You can purchase wire at most hardware stores or craft stores. I buy it over the internet from Rio Grande in bulk. This is 18 gauge copper wire. Simply cut a length (about 3'), form circles on each end and start free forming your flower.

Friday, October 16, 2015

How to Lengthen Store-Bought Panels

I usually can find pre-fab window panels that I like, my problem is that they are never long enough.  The standard 84" barely covers the window if you hang the pole right above the casings, and that's a no-no these days.  To add some height to your room you want to hang the pole as high as you can, within inches of the ceiling where possible.  That's not 84". 

What to do, what to do?  Custom window treatments can break the bank but there are ways to take store bought window panels and bring some life to them, making them custom for a fraction of the cost.  If you're looking for a no-sew alternative, sorry, this is not it.  I sew, that makes it too easy to spend the extra time (it's probably not a whole lot of extra time) and do it right.  Well, not right, that's not the best choice of words, but I don't do no-sew. 

BTW, this is the perfect thrift store find, there's always lots of window panels and it'd be so easy and inexpensive to grab a pair and make them your own.  For my top 10 Items to Grab for Unique Home Decor subscribe to my Postcard Cheat Sheet Series, today's postcard is entitled Thrift Store Gold.

Tuesday, October 13, 2015

How To Make Easy Table Place Mats for Cheap


These are so simple its scary, all you have to do is sew relatively straight lines.  First thing, pick out your fabric.  The amount you need will vary depending on how many placemats you want to make and if the pattern needs to be cut a special way.  Keep that in mind when picking fabrics. Repeats also vary drastically for every fabric, when in doubt ask at the fabric store.  If you're buying their fabric they'll gladly help you.  If not, gather your information (fabric dimensions and repeat, a picture of your fabric would also be helpful) and message me, I'll figure it for ya.

I chose a plaid that my grandmother gave me, FREE!  Can't beat that.  I am making six placemats.

One of the best places to pick up yardage for projects such as this is your local thrift store.  For my top 10 Items to Grab for Unique Home Decor subscribe to my Postcard Cheat Sheet Series, today's postcard is entitled Thrift Store Gold.

Sunday, December 21, 2014

How To Make A Christmas Tree Pillow

While making memory pillows for gifts this year I got to thinking, "this fringe would make a really cute Christmas tree", so another pillow idea was born.  I still have a couple people that I don't know what to do for and this is a perfect gift that is relatively quick and easy to put together. 

You'll need a few supplies; felt for the tree, trunk and star at the top, a base fabric for the front and back and sewing supplies. 

I chose a solid green felt and a green swirl flannel that I fell in love with.  I plan to alternate the two materials for the tree and use the swirl for the back.  I also grabbed a small square of brown and yellow felt.  I always use sheet material for the backing fabric (it's readily available and inexpensive, perfect for projects such as these). 

So, to get you started, draw the size of tree you want on a piece of paper and cut out your pattern.  I am alternating so I cut one tree from the solid green and one from the swirly fabric.

I stacked them on top of one another and marked them in 1" increments.  Cut them out into strips as shown.  If you're alternating like I am you'll get two trees from this.

 Here it is just laid out on the table. 
Note:  The second tree will start and end with the lighter fabric, your pillows will not be exact matches.

You will need a 15" piece of backing fabric for the front of the pillow.  (a 14" pillow form plus 1/2" seam allowances).  Center your pieces on the backing fabric, slightly overlapping and pin in place.

 I used different thread colors to stitch these on so sew a straight stitch attaching all swirly fabric pieces then switch out your thread and sew the dark green pieces, removing pins as you go.

Here is what you should have at this point, after clipping all your threads and cleaning it up.

Cut a small trunk out of brown felt and tack it on at the base of your tree.  I did a simple running stitch and matched the thread as close as I could.  You could do all kinds of cute things with this.
  
 Then I cut out the star for the top.  Same thing, stitch it on at the top of your tree.

You will need a 15" square piece of fabric for the back of your pillow (I used the green swirly, I love that fabric).  Lay it face-up on the table.  Take the front piece and lay it face-down on top, pinning the two together leaving an opening at the bottom for the pillow form.

Sew together using a 1/2" seam allowance, remember to leave your opening.  Sometimes I stitch it a second time around for good measure, back-stitching at start and finish.

I fringed the tree at this point.  Make sure you've got a nice pair of sharp scissors and just start cutting each row up to the stitch line, being careful not to knick it. 

Insert pillow form and pin opening closed.

 I always use a doubled piece of thread and slip stitch the opening closed.  Here's a great tutorial in case you need one for this, http://www.instructables.com/id/Hand-Sewing-Basic-Slip-Stitch-Blind-Stitch/

I finish with a quilter's knot, after you've closed up your pillow send your thread out the back close to the seam.  Wrap your thread around your need 3-4 times,

 keeping your thread tight stick your needle back into the hole that your thread came out of in the pillow back.  As you pull your needle through the fabric a tight little knot forms.

Now, you've got your knot and you need to hide it.  I take my needle and stick it through the fabric between the knot and my protruding thread for stability and then pull on the thread.  Your knot will get sucked inside of the pillow and disappear.

See, no knot (if you look close you can see where the hole was).  Clip your thread and you're done. 

You've got a nice, closed seam and an adorable Christmas Pillow.


Related Posts Plugin for WordPress, Blogger...