I am a hoarder of beautiful tins, I admit it, I can't pass them up. Many times they're not usable for my purposes but they're beautiful so I must have them. This particular tin I have found a couple times and it's perfect! Wait till you see how many projects I've made so far and there's still plenty left to work with.
I forgot to take a picture of the tin before I started cutting but look at all those lovely pieces I have to work with.
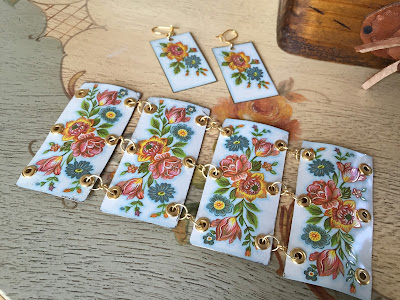
I decided to make a bracelet and earring set for my first project. I'd love to teach a class at the new shop for this, so easy and you leave with completed jewelry.
I started by cutting down my pieces so they are a better fit on the wrist. I used the block to hammer them relatively flat (when cutting them up they tend to get bent in the corners, amongst other things).
I used a file to sand down any rough edges and round the corners. Then, using canned food I hammered each piece giving it a slightly rounded finish, you can see what I mean in the next picture.
I marked the pieces where I wanted the eyelets and started punching holes with my crop-a-dile, love that thing....
Using four of my matching tin pieces I linked them together. I haven't added the closure yet, I started to make one but the wire just wasn't sturdy enough for my liking so I need to get into Michael's sometime and pick one up. Also, if I'm teaching this for a class we will have limited time, making closures might not be an option, especially if we're making earrings too.
Of course we are. Again I used ear wires from Michael's that match the wire and eyelets, making the earrings a really easy project. Simply prep the smaller pieces of tin with a little sanding, mark and punch your hole and attach your ear wire with a ring. It's as easy as that and you've got yourself an adorable new bracelet and earring set.
Oh but why stop there? You could continue on and add a necklace quite simply. I used a different color piece from the same tin for this project. Simply cut it out and make random hole punches around the outer edge. I then took some wire and strung it through the holes, leaving a tail at the bottom on both sides.
I strung a few decorative beads sporadically throughout as well...
... and used the "tails" at the bottom to make a ring to add a little bling.
Another quick project for a class that requires very little jewelry making experience yet you leave with a beautiful pendant necklace that you made yourself.


Were did you get the pictures from? What did you coat the picture with too stop it peeling and paste it on?How did you seal it too stop going rusty.
ReplyDeleteMy mother for as long as I remember had a beautiful, large tin with geisha's on it. She recently passed and as I started going through her things, I went to grab the tin and realized it had come apart on one side. It was headed to the trash until I just saw this, thank you so much!
ReplyDeleteHi Bronwyn s, I was wondering the same thing But she is actually stating that the pictures were a part of the Tin that she cut up for use. I haven't found any beautiful tins such as these.. yet!
ReplyDelete