Thursday, December 31, 2015

How to Tile an Accent Wall in Your Bathroom

I recently helped a friend remodel her bathroom and my favorite area of the whole room is the vanity space.  Talk about an amazing transformation.  Here's a look at the before:


My plan for this part of the bathroom:

Monday, December 14, 2015

Simple Updates You Can Make To Transform an Ugly 50's Bathroom

A couple years ago I helped a friend with some simple updates in her 50's home.   It's really amazing what a little paint can do.  

To subscribe to our Cheat Sheet Postcard Series and get today's postcard, a free printable with ten different ways to update and add some flair to your bathroom, please click here:

Here's a couple before pictures:

Sunday, December 6, 2015

How Do You Handle Unexpected Challenges In Your Day?

My husband picks up the mail every night when he gets home from work. On Wednesday, this is what he found:
This letter is marked November 30 and we got the letter December 2.  At least 24 gallons of water every day for 4 days has been leaking, somewhere in the water system of our home.

Saturday, December 5, 2015

Bah Hum-Bug! Yes, I said it!

Growing up I remember cutting a comic out of the Sunday paper for my dad, the Lockhorn's, depicting Mr. Lockhorn begrudgingly putting up Christmas lights, spelling out Humbug in the front bushes.  That's kind of my mood this year.  Not kind of, that IS my mood this year.

I haven't put up a single decoration and I really don't care if I do or not.  When we built our home my husband wanted a tall Christmas tree and now, well, I really despise that tree and have an adult temper tantrum (that's a real thing you know) every time I have to put the lights on.  I'm getting too old to be standing on a ladder precariously balancing in a ridiculous effort to string lights on a "pre-strung" tree that hasn't worked from day one (but don't get me started on that one).

My boys are grown and really don't care if I decorate or not so I'm giving myself permission to opt out this year.  It's really quite a relief.   Have you ever had a year where you just weren't in the mood for all that jazz and decided to keep it simple?  The world didn't end, did it?

Monday, November 30, 2015

How To Easily DIY A Stone Backsplash

When we were building our new home I knew I wanted a rock backsplash but I didn't want the standard mosaic tiles, I wanted the full profile of the rocks, with all their flaws and oddities. I fell in love with these rocks at Old Time Pottery and bought enough to finish off my project.
 
My husband was leery, to say the least, so he made plywood backs for me to work on instead of putting it directly on the wall. That was fine with me because I had enough work to do at the house (tiling, painting, countertops, etc) this I was able to work on in front of the T.V. and get a break from the craziness of building the house.

Friday, November 27, 2015

How to Update Your 50's Kitchen On A Budget

I've been helping a friend update her 50's ranch.   Our goal, major impact without breaking the bank.  One of the first areas that needed tackled was the kitchen.  A complete overhaul would be wonderful but that was not our plan.  We opted for some paint and elbow grease.  What an amazing transformation to such a dingy old kitchen.

To subscribe to our Cheat Sheet Postcard Series and get today's postcard, a free printable with ten different ways to update and add some flair to your kitchen, please click here:

Wednesday, November 25, 2015

How To Make A Unique Piece of Furniture With Concrete

 I am completely infatuated with concrete, call me weird, (that's alright you won't hurt my feelings) but the incredible things that people are doing with concrete keeps me excited and inspired to do more.

My love affair with concrete prompted me to add a new postcard to my Cheat Sheet Postcard Series, a collection of postcards to collect and reference on a variety of topics.   For your free Subscription to the series, click here:  10 Ways to Decorate Your Home with Concrete

This is a conference table my husband and I made for his work.  Here it is all framed up.  You can see the edge liner we used and the veining that was added with caulk.  We will be using Buddy Rhodes Countertop Mix for this project.  After mixing you place it by the handful, gently twisting as you put it in the bottom of the framing and work it up the edges.  As you add handfuls you will be forming crevices that you'll fill in later with a contrasting color, makes for a great texture.  This technique is done upside down, so the bottom of your form will be the top of your table.

Monday, November 23, 2015

How To Easily Fix The Hole In A Furniture Top With BarnWood

I bought this adorable desk at an estate sale for next to nothing. I have never seen a desk quite like it.  From the bottom where it rests on the floor to the way the handles line up down the front, I was in love from the moment I saw it and had to have it.

One of my favorite finds are furniture pieces that have great bones but need a little personalization and TLC. 

This piece had really only one problem, there's quite a hole in the top of the desk,  a "make it work" moment.

Friday, November 20, 2015

One Really Cool Way We Used Concrete to Finish A Fireplace

I really love the many ways concrete is now being used.  From counter tops and tabletops to light fixtures (yes, I said light fixtures) and decorative floors.

I'm always surprised and totally inspired by the creative uses people come up with for such a common product.  I've added a new postcard to my Cheat Sheet Postcard Series, a collection of postcards to collect and reference on a variety of topics.   For your free Subscription to the series, click here:  10 Ways to Decorate Your Home with Concrete.

We had done quite a few concrete projects around the house but this is the first project I've done inside. It's messy, so lots of prep-work is involved, but well worth the effort. You can personalize it and get as creative as you want.

We built this house a couple years ago (the Spec House) adding a concrete hearth and mantle with a carved vertical concrete fireplace surround, very fun project!

Wednesday, November 18, 2015

The Wonderful World of Vintage Textiles

I find myself drawn to particular things when walking through an antique mall or thrift shop.  Very near the top of my list is textiles, of any kind.  From old clothing to napkins and tablecloths or a beautiful quilt will have me drooling.  I just love them. 

Here's a sampling of great things, within the textile realm, I found at a local antique shop:

Monday, November 16, 2015

How To Give New Life To Worn Out Wood Furniture

I love to look for quality wood furniture pieces at garage sales and thrift stores.  If you are persistent and keep at it you can find some really great stuff.  

For a quick reference quide of my top 10 Items to Grab for Unique Home Decor subscribe to my Postcard Cheat Sheet Series, today's postcard is entitled Thrift Store Gold.

I am working on some furniture pieces and playing with decoupage, I'm having way too much fun!  I love the two-tone furniture that is painted white and the drawers/door fronts are left natural wood.  I have been wanting to do a piece like that for a while and finally found a couple great pieces to play with.

Sunday, November 15, 2015

Memoirs of Building Our Home- Part 6


We started building our home in the Spring of 2007 and moved in the end of January 2008.  My husband works in the construction industry so he managed the build and we did quite a bit of the work ourselves.  Lots of sweat, time and energy went into our home and for me, even after seven years, there's not much I'd change.

Have you ever built a home?  Any regrets or things you'd do differently?  Would you ever do it again?  I'd love to take you through our experience and give you a look at our finished product, definately a lot of work but so worth it!

Here are some links to get you caught up if you'd like:
Part 1the basement is poured and the beams are in, time for framing to begin.
Part 2- framing is nearly done
Part 3- Windows and doors and a few small concrete projects
Part 4- Lots and lots of wiring and plumbing.  The guts of the project, and the drywall is up and painted.
Part 5- Three main projects with lots of "behind the scenes" work getting completed; the fireplace, the staircase and I started tiling in the master bathroom.

For me, the tile work has just begun.  Kitchen cabinetry is going in and the hardwood floors are being installed.  Electrical is pretty well done, plumbing is a work in progress, the carpenter is working hard right now and things are really starting to come together.

Friday, November 13, 2015

How To Make A Fringed Memory Pillow

When we lost my grandfather a couple years ago I asked grandma to keep his clothes for me so I could make a quilt, now what to do with all the leftovers?  I decided pillows were the perfect solution.  I have enough material to make lots of pillows vs. only one more quilt.  Pillows it is!

Wednesday, November 11, 2015

How To Get More Bang For Your Buck With A Back-Splash

If you're looking for a relatively easy, inexpensive way to add some pizzazz to your space and give it an update, how about a back-splash.  

If you're considering updating your kitchen check out my Cheat Sheet Postcard Series, today's postcard, 10 Ways To Update Your Kitchen On A Budget.

Here's a few of my favorite projects.

Monday, November 9, 2015

Fun With Concrete- How We Made A Unique Vanity Base For Our Bathroom

After a trip to World Of Concrete I was soooo inspired to use concrete in as many ways as possible in our new home. I told my husband I wanted an oval shaped vanity base in the little hallway bathroom. He thought I was crazy, as usual, but proceeded to frame it up for me and "make it work." We used Buddy Rhodes Concrete Mixes. If you haven't seen his stuff you should take a look-amazing stuff!

We've used concrete in many varying ways around the house.  Have you done any creative work with concrete?  I'm always surprised and totally inspired by the creative uses people come up with for concrete.  I've added a new postcard to my Cheat Sheet Postcard Series, a collection of postcards to collect and reference on a variety of topics.   For your free Subscription to the series, click here:  10 Ways to Decorate Your Home with Concrete.

Friday, November 6, 2015

How To Make Simple Updates To a Dark, Dreary Kitchen on a Budget

When the boys were in High School, over Spring Break I took a trip to my moms while they visited the in-laws. Mom and I spent an extended weekend (roughly 5 days) busting our butts getting her kitchen overhauled. The plan was to spend as little as possible and just freshen it up. It's such a small, dark space so automatically we knew the cabinets had to be painted. We also opted to put down a new floor and add a backsplash. Mom ended up changing out the countertops and sink as well. It really turned out great and we got to spend some quality time together. It was lots of hard work but we had a blast!

To subscribe to our Cheat Sheet Postcard Series and get today's postcard, please click here:

Wednesday, October 28, 2015

Memoirs of Building Our Home- Part 5

Have you ever designed and built your own home, how did it go?  We started our journey in the Spring of 2007 and moved in the very end of January 2008 and what a journey it was.  This is my attempt to chronicle the progress we made and the variety of mini-projects we took on ourselves.


Here are some links to get you caught up if you'd like:

Part 1the basement is poured and the beams are in, time for framing to begin.
Part 2- framing is nearly done
Part 3- Windows and doors and a few small concrete projects
Part 4- Lots and lots of wiring and plumbing.  The guts of the project, and the drywall is up and painted.

Now the real fun begins.  Three main projects are going on right now:

Saturday, October 24, 2015

How To Make Your Own Hanging Light Orb

My husband made one of these last year on a whim and proceeded to fill our yard with six more last
winter.  We live in the country on a winding road, it makes me smile every time I turn the first corner and see the faint gleam of lights peeking thru the trees.  With each turn it becomes more clear what, and where the light is coming from.  Makes me smile every time.

Last night the lights were on when I got home, in honor of our first bon-fire of the year tonight, what an immediate "pick-me-up" as I turned into the drive.


The base is made from wire mesh used in concrete work that can be purchased by the roll at Home Depot/Lowe's (usually with the concrete mixes).  Be careful working with this stuff, it'll get you if you're not careful, it's very sharp and has a mind of its own. 
First, cut the wire mesh into 14' lengths, roughly 4" wide, our mesh is 4" square so one width, (these are large orbs, guessing roughly 5' in diameter, do your math, you know, the stuff we all said we'd never use, to change the sizing).  Don't worry, you're not alone, I had to look it up.  Here's a link to help if you're wanting to make varying sizes, Finding the Circumference of a Circle.   

Hint: have someone stand on the end as you unroll the mesh or it'll fling itself right back at ya'.  Once it's unrolled and cut to length flip it upside down to continue cutting.

You're going to lay your pieces out on the ground in a "star" crisscrossing each other in the center, evenly spaced using four strips and zip tie them together, that'll be the bottom of your orb.  Grab the other ends pulling them upward to form the top and zip tie them together to form the ball.  Hint: use a hanger of some sort as a second pair of hands to hold each strip as you pull it up.

To help them hold their shape use a straight piece of wire, form hooks on either end that'll grab the top and bottom, or zip tie to it,  and hold the ball in shape (so the bottom doesn't want to sag). 

Add your lights with little zip ties, hang it in the tree and grab your extension cord.  You're ready to light it up!


If you don't need them to be this large you can buy wire planters from your local hardware store, Cocoa Hanging Baskets, two per ball, and zip tie them together.  Add your lights and voila', you're done.  Just remember, you're limited in the size of a ball you can make.  With a little more time and effort you can customize them to your liking.

Either way you've got great new lights for your yard.


Thursday, October 22, 2015

How To Make A Unique Kitchen Island With Concrete

When designing our home I had my heart set on a curved island wall. My husband did not!  He kept avoiding the wall thinking I'd change my mind.  Finally, when the time came he caved and started framing it out, cursing me under his breath I'm sure all the while.  We had a few issues when it came pour time, but all in all we both love the end result.

My love affair with concrete prompted me to add a new postcard to my Cheat Sheet Postcard Series, a collection of postcards to collect and reference on a variety of topics.   For your free Subscription to the series, click here:  10 Ways to Decorate Your Home with Concrete

Wednesday, October 21, 2015

How To Make Your Own Beaded Napkin Rings

For years my mom has been trying to get me interesting in jewelry making, I have laughed and scoffed and then a couple years ago she finally won me over. I love the creative expression and the ability to create "wearable art". There is too much to do to justify spending too much time on it for now, but I have found ways to incorporate a passion for beading into usable, decorative items for the home.

You can purchase wire at most hardware stores or craft stores. I buy it over the internet from Rio Grande in bulk. This is 18 gauge copper wire. Simply cut a length (about 3'), form circles on each end and start free forming your flower.

Monday, October 19, 2015

8 Fun Ways to Repurpose and Get Creative With Silverware

Adorable Door Handle
http://www.tiriordino.com/fai-da-te-bricolage/idee-per-riutilizzare-le-vecchie-posate/
A few years ago I had to take care of my grandmother's estate and came across lots of plated silverware.  It has such a beautiful patina and I'd love to find a use for it.  The obvious use, as silverware, never crossed my mind of course.  I'm looking for something outside the box with a little "funk" to it.

Silverware is one of those things I always keep my eyes open for, whether its a single spoon or a box full of utensils its always a gold mine of opportunity.  For a quick reference quide of my top 10 Items to Grab for Unique Home Decor subscribe to my Postcard Cheat Sheet Series, today's postcard is entitled Thrift Store Gold.

Sunday, October 18, 2015

How We Created A Unique Patio Table Using Concrete


A few years ago I tagged along with my husband to a Concrete Show in Nashville, similar to World of Concrete but on a much smaller scale (and it's not Vegas, ugh, Vegas is not for me).   Anyhow, I took a couple classes.  One was with a man named Ben Ashby who developed a concrete countertop system that I absolutely fell in love with.  He really does some incredible stuff.  He also has wonderful edge forms for really amazing, unique finishes.  Fabulous stuff.  You can find out more about The Ashby System here:  http://countertopsolutions.net/wp/aboutus/about-the-concrete-countertop-ashby-system/.

My love affair with concrete prompted me to add a new postcard to my Cheat Sheet Postcard Series, a collection of postcards to collect and reference on a variety of topics.   For your free Subscription to the series, click here:  10 Ways to Decorate Your Home with Concrete


We came home from that trip completely inspired and started on our first piece using the Ashby technique.

Saturday, October 17, 2015

How To Make Cute Wall Art From Leftover Wallpaper

I fell in love with this wallpaper I was hanging for somebody else so I asked if I could keep some scrap. I had a plan. Well, it's been a couple years and I found this is the closet, I think it's about time I did something with it.

Scrap wallpaper and some ribbon is all you need. 

For a quick reminder of what to look for, where you might find cool paper products and how you could use them to uniquely decorate your home, click here: Decorating Your Home With Paper for a free subscription to my Cheat Sheet Postcard series.

Friday, October 16, 2015

How to Lengthen Store-Bought Panels

I usually can find pre-fab window panels that I like, my problem is that they are never long enough.  The standard 84" barely covers the window if you hang the pole right above the casings, and that's a no-no these days.  To add some height to your room you want to hang the pole as high as you can, within inches of the ceiling where possible.  That's not 84". 

What to do, what to do?  Custom window treatments can break the bank but there are ways to take store bought window panels and bring some life to them, making them custom for a fraction of the cost.  If you're looking for a no-sew alternative, sorry, this is not it.  I sew, that makes it too easy to spend the extra time (it's probably not a whole lot of extra time) and do it right.  Well, not right, that's not the best choice of words, but I don't do no-sew. 

BTW, this is the perfect thrift store find, there's always lots of window panels and it'd be so easy and inexpensive to grab a pair and make them your own.  For my top 10 Items to Grab for Unique Home Decor subscribe to my Postcard Cheat Sheet Series, today's postcard is entitled Thrift Store Gold.

Thursday, October 15, 2015

How to Make a Memory Quilt from Your Lost Loved Ones Clothing

My grandpa died a couple years ago and lately I've been thinking about him a lot, probably because I just came back from a trip visiting grandma.  All the wonderful memories of grampy are flooding back.

Here he is with his Harley-D (as he would call it).  Shortly after this he had to quit riding, he couldn't keep it upright anymore.  He got himself a little scooter and would ride that up and down the road in front of their house.  Didn't take long before that had to stop as well....


I had grandma save me some of his clothes so I could make a quilt.  Here's what I came up with:

Wednesday, October 14, 2015

How To Fix An Ugly Retaining Wall With Vertical Carved Concrete

Recently I've received multiple questions regarding the decorative concrete finishes we've applied to various projects around the house so I thought I'd share with you a little more about the process.


Do you have an ugly concrete raining wall, we had two?  I hate looking at them. When we built the house I knew something would have to be done to hide them. I took a class or two and voila'.... a unique, OOAK carved rock wall. Much better.

Tuesday, October 13, 2015

How To Make Easy Table Place Mats for Cheap


These are so simple its scary, all you have to do is sew relatively straight lines.  First thing, pick out your fabric.  The amount you need will vary depending on how many placemats you want to make and if the pattern needs to be cut a special way.  Keep that in mind when picking fabrics. Repeats also vary drastically for every fabric, when in doubt ask at the fabric store.  If you're buying their fabric they'll gladly help you.  If not, gather your information (fabric dimensions and repeat, a picture of your fabric would also be helpful) and message me, I'll figure it for ya.

I chose a plaid that my grandmother gave me, FREE!  Can't beat that.  I am making six placemats.

One of the best places to pick up yardage for projects such as this is your local thrift store.  For my top 10 Items to Grab for Unique Home Decor subscribe to my Postcard Cheat Sheet Series, today's postcard is entitled Thrift Store Gold.

Monday, October 12, 2015

How To Use Paper In Unique and Creative Furniture Projects

Have you ever walked through a Home Decorating shop and found a single roll of wallpaper (wrapping paper works too) and passed because you just didn't know how you'd use it?  I know I have.  More often than not, these days, I grab it and figure out how I'll use it later.  

As you can imagine my paper stash is growing fast.  I really can't help myself, I just love paper and there's so many creative ways to use it.  

Sunday, October 11, 2015

How To Decoupage a Piece of Furniture with Memories

I find myself becoming more and more sentimental as the boys are getting older.  One is a Senior now at Western Kentucky, recently engaged while the other is a Junior at SIUE and lives at home.  It won't be long and they'll be raising families of their own.  Amazing!

I have been throwing around multiple ideas for what to do with my coffee table in the living room, that I hate, and finally made a decision, my sentimentality won out!


I am well underway with the project and am really, really happy with my choice.  I'm thinking I'll be spending more time in the living room now.  Here's a picture from when we moved in (it's changed a little since then but this is the best before picture of the table).

One of my favorite thrift store finds are furniture pieces that have great bones but need a little personalization and TLC. 

Thursday, October 8, 2015

How To Make A Unique, Inexpensive Paper Ball Garland

I am loving all the paper crafts I'm seeing on the internet these days. Beautiful stuff. One project in particular caught my eye.... paper ball ornaments.
They were beautiful. Put together using wire with little caps on the top and bottom using beads/buttons/ etc. Wow! Gorgeous! My only problem is money, unless you have a stash of supplies, it's gonna cost you a pretty penny to make them.


I thought, there's got to be a way of making them without any purchases needing to be made. Here's what I came up with. I've made a garland so far and would love to use them for ornaments on my tree this year. Who knows what else I'll come up with, any ideas?


For a quick reminder of what to look for, where you might find cool paper products and how you could use them, click here: Decorating Your Home With Paper for a free subscription to my Cheat Sheet Postcard series. 

Tuesday, October 6, 2015

How To Easily Make Your Own Square Jewelry Link

In this tutorial I would like to show you how to make this square jewelry component.  

Monday, October 5, 2015

How to Decorate Your Home with Paper on the Cheap

I recently saw an episode of "Flea Market Flip" where a dresser was transformed using old love letters.  It turned out beautifully and got me to thinking, outside the box, how about a kitchen accent wall or backsplash wallpapered with recipes?

 I purchased a couple boxes of recipes at an estate sale and am waiting for the perfect project to use them on.


Thursday, October 1, 2015

4 Quick and Easy Ways To Market Your Art and Gain Clientele

Over the years I've tried numerous marketing techniques and spend a butt-load of money on advertising that really didn't  bring in much business.

On the flip side, I have found 4 wonderfully easy and inexpensive ways to market myself and gain clientele without breaking the bank.  You will not believe how simple they are and yet I am constantly overlooking them.


For an easy printable of my  top 4 "Quick And Easy Ways To Gain Clients" and a subscription to my "Cheat Sheet PostCard Series" subscribe here.

Tuesday, September 29, 2015

12 Adorable Cookie Tin DIY's and A Free How-To


A few years ago my mother and I took off on a driving trip to Florida, stopping along the way at every Antique Mall and thrift store we could find.


Boy did we ever have fun!  Although my love affair with tin hadn't started yet, mom's was in full swing.

Last summer we took another trip, this time to Bead 'N Button in Milwaukee.  It was here that I completely fell in love with tin and began to see the many possibilities for creative expression.

All those tins my mother bought on our road trip were cut down and turned into adorable Christmas tree ornaments.  The Hershey's cocoa tin pendant pictured is one of those ornaments that she made into a necklace for me.  Isn't it cute?

Do you make jewelry or other handmade items and are you looking for easy, inexpensive ways to gain clientele and sell your items.  For my top 4 "Quick And Easy Ways To Gain Clients" and a subscription to my "Cheat Sheet PostCard Series" subscribe here.

Friday, September 25, 2015

Unique Jewelry Creations and One Easy Way to Gain Clients

Over the past couple years I have been making jewelry and loving every minute of it.  I have found my favorite materials to work with are copper and natural stone with some wire-weaving mixed in.  

Yesterday, while out running some errands I happened to be wearing one of my favorite necklaces and was pleasantly surprised and encouraged by the amount of compliments I received.  Wow!


For my top 4 "Quick And Easy Ways To Gain Clients" and a subscription to my "Cheat Sheet PostCard Series" subscribe here.

Thursday, September 24, 2015

A Look Back.....

This is a look at what I was doing last year about this time.  I really wish I could say I've made great strides over the summer with this project, but I'd be lying.  Here's to another summer gone and a hopeful heart that next year I'll be able to check something, anything, off of my growing project to-do list.

Saturday, September 19, 2015

Memoirs of Building Our Home- Part 4

Have you ever designed and built your own home, how did it go?  We started our journey in the Spring of 2007 and moved in the very end of January 2008 and what a journey it was.  This is my attempt to chronicle the progress we made and the variety of mini-projects we took on ourselves.

Here are some links to get you caught up if you'd like:
Part 1the basement is poured and the beams are in, time for framing to begin.
Part 2- framing is nearly done
Part 3- Windows and doors and a few small concrete projects

The framing is done, windows and doors are in and we now have a lockable shell.  Its time to put in the plumbing, electrical, computer/phone wiring, house vaccuum plumbing/wiring and gas lines.  Do you think I took a single picture of all that?  

Monday, September 14, 2015

Business Card Fun....

Over the past couple weeks I've been playing around with ideas for business cards.  I'm thinking of using my "artsy-fartsy" creations for the front of a business card and filling in the back with more pertinent information (and possibly snippets of the other business cards).  So far I've started six differing designs and am planning to pick and choose those that I like and would like to have printed.  Here's what I've got so far:
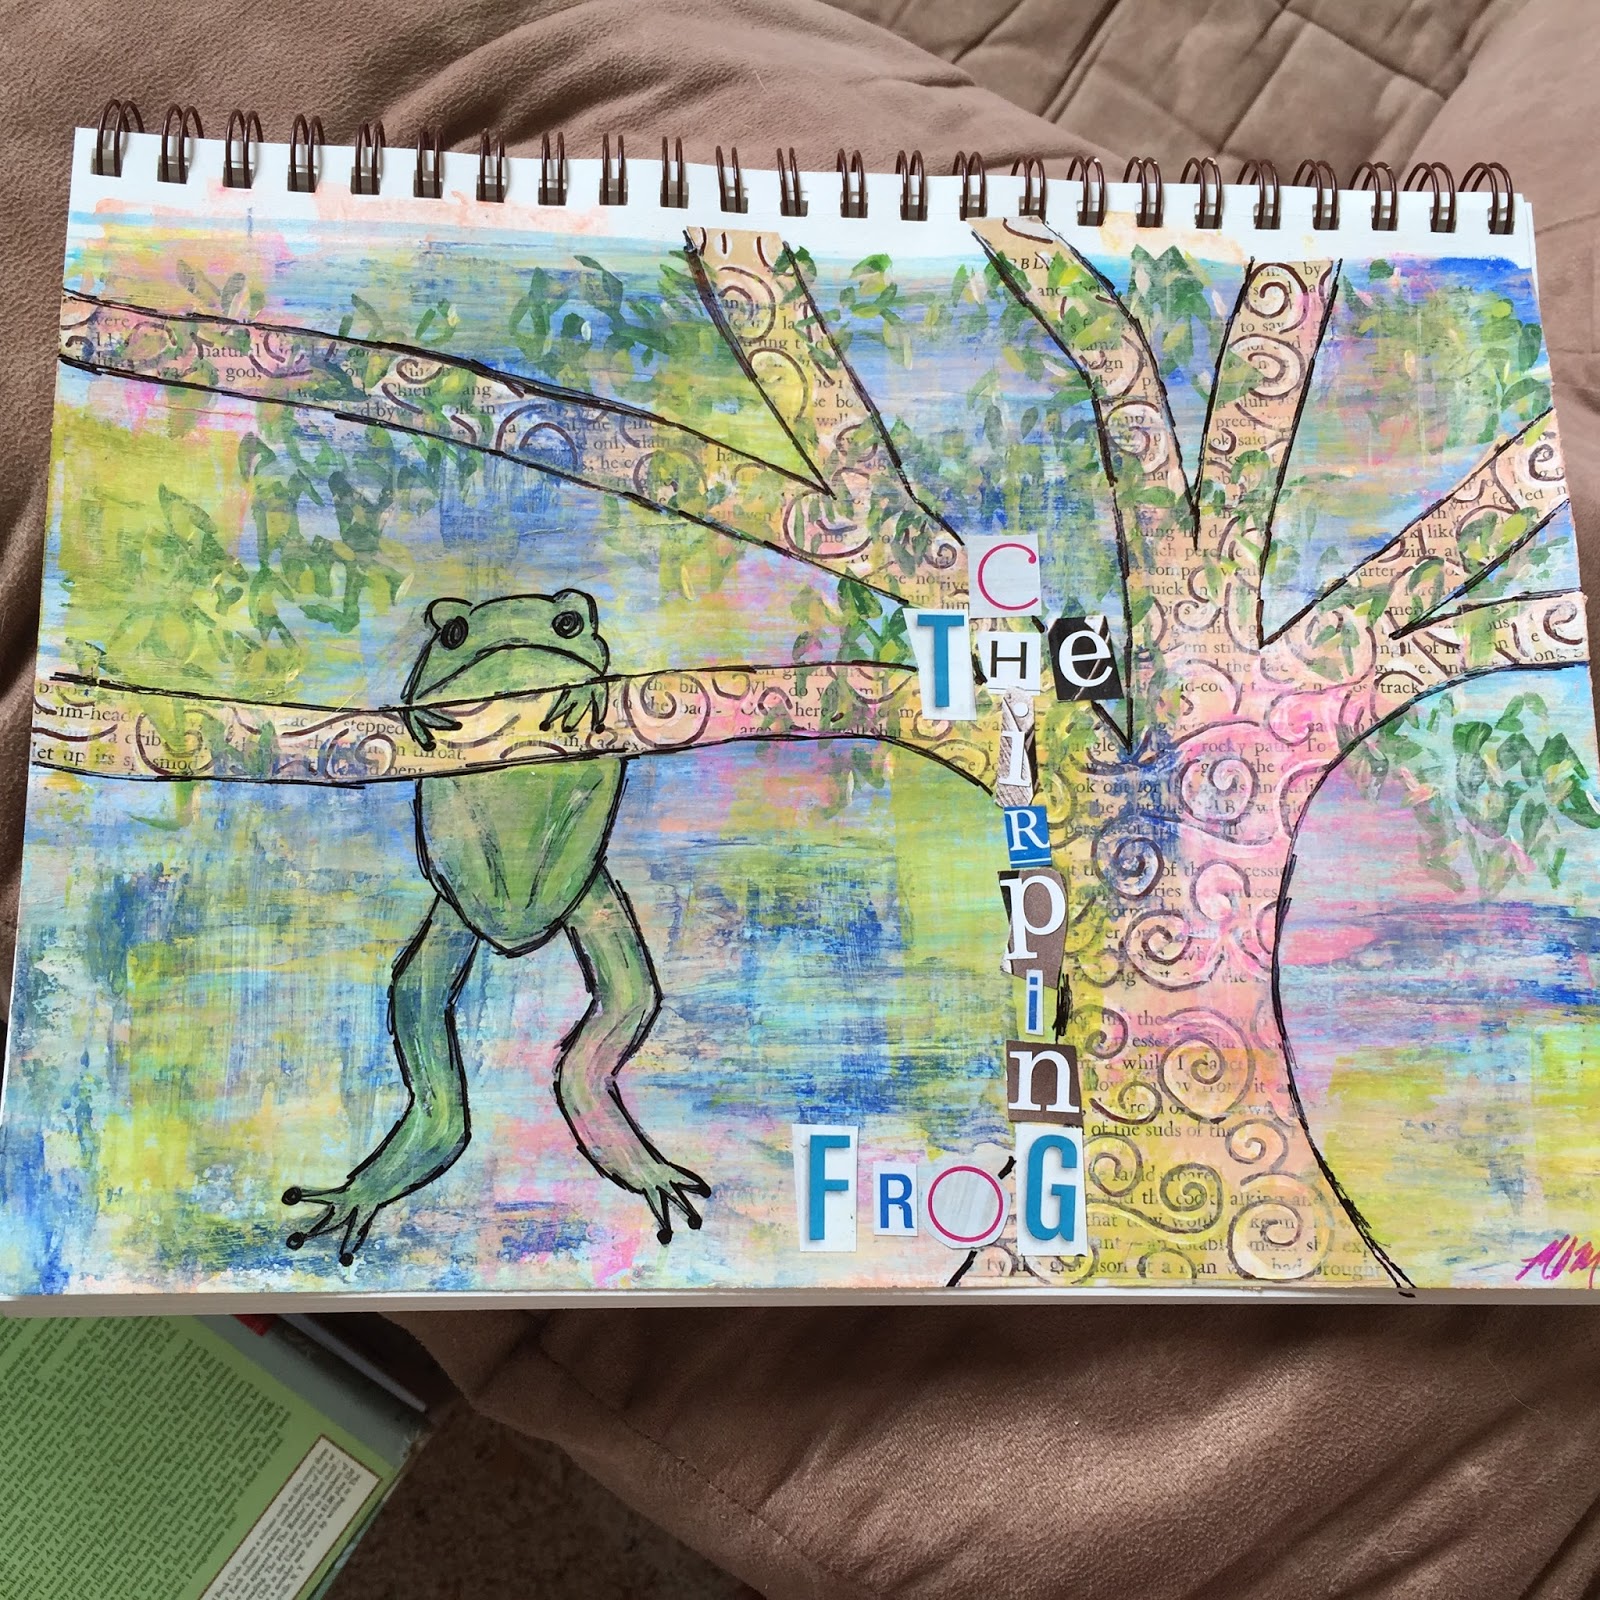
#1
I love the look of a color-washed background so that's what I started with.  I thoroughly wet the paper and then start adding the paint running it horizontally and adding water as necessary.

 Next I used book pages to cut out my tree and drew in my froggie.  I thought the tree was too plain so I used a stencil to add a design.

 What's a tree without leaves?

 I thought it was too boring still so I came in with a pallet knife and more paint.

Outlined everything with black marker and added "The Chirping Frog" with letters cut out of a magazine.  I think this one is my favorite so far.

#2
My mom told me the first attempt was too busy, still my favorite mom but I'll try again and leave it more plain.
 Same background technique except I drew in my tree and frog first and tried to keep those areas fairly clean.

 I used decorative paper to make my frog and the inside of the tree is a short sentiment about antiques and then a montage of a variety of antiques and collectibles by name or maker.

I used magazine letters again, I love them and outlined everything in black.  Sorry mom, it's still too plain.  I think once I add some leaves to it I'll be happy with it though.

#3
 I started with a variety of paint colors, three shades of pink, two blues and a couple greens.  I used a palette knife and just started adding colors.  I also made the flag pole with a pallet knife.

 I made a building with paper and added in my frog, changing her up this time.  I am liking it so far but its not done yet.

I added my name, "The Chirping Frog" with magazine letters again (can't help it, I love them) and started writing out a few things about my business on the right bottom corner.  I really don't like the corner so I'm probably going to end up scrapping this one.  Once I start messing with it I'll have no choice.  I can always re-do it later.

#4
 Last night I got a start on two more ideas.  Not sure I like this one, but here goes.  The background is a solid piece of paper.  I cut out the colorful flowers and Miss Froggie out of paper and used spackling compound and a stencil to add the white flowers.

 I added a little color to the Frog and the raised plaster flowers.  It's a little too bright for me so I tried to tone it down with some water and white paint.

 Not sure what else I'll do now.  I still need to outline and add my name, "The Chirping Frog" but really not sure what else I'll do.  This one's still percolating.

#5
I'm thinking I'm going to love this one but it's just a start.  I began by ripping a variety of papers in shades of brown and green (the idea of ground to treetops).

Then I drew in my tree with white paint.  I'm a contrast girl so I'm thinking I might just leave it white, and that's where I quit for the night.  My "artsy-fartsy" work space is upstairs in the boys loft but when its dark the lighting is horrible.  Lots more to do on this one but I'm loving the direction its taking so far.

#6
This is a trial which I proceeded to paint and hated so I threw it out.  Planning to try again later.  I really love the linework but I did this one in pencil, planning the next one in ink (what color, I'm not sure).  

So, what do you think?  Am I completely crazy to try using my own artwork for business cards?


Related Posts Plugin for WordPress, Blogger...