Thursday, June 23, 2016

How To Carve A Vertical Concrete Wall

This is all we need to get some carved vertical concrete work done.  A couple buckets, a mixer, releasing agent, chip brushes, a couple trowels and some stamps.   Each bag of Tru-Pac gets mixed with a 60 pound bag of mortar and covers roughly 12 square feet.

Thankfully, my hubby volunteered to do the mixing as long as we start bright and early in the morning, and I do mean bright and early!  I am not a morning person but handling it all by  myself makes it go even slower.... I'm too worn out from the mixing process that I can't do as much each day and by starting so early I avoid the hottest parts of the day, win/win!  Even with him mixing I can only handle 6 batches at a time and it takes me roughly 5 hours from start to finish.

Here's a great video that shows how it mixes up and goes on the wall.  Really neat stuff to work with and so versatile, imagine the possibilities.


First things first, there's a layer of plywood on the wall and we've added roof liner as well, then the metal lathe.  Be careful with this stuff, its nasty and will tear you up.  I forgot my gloves one time and paid for it.  Ouch!

To ensure your finished work stays on the wall you've got to add lots, and lots of screws, every 6-8 inches.

Once your metal lathe is on the wall its time for a scratch coat.  Just use the same mortar you'll be mixing with your tru-pac.

Now, its time to add the finish layer.  I always forget how much fun this stuff is to work with.  What you see here is my first batch.  It should cover 12 sq. feet at 1 1/2", obviously I can't throw it that thin.  My first day of work six bags averaged out to about 7 sq. feet per bag.  Hoping to do a little better than that tomorow.

To apply this to the wall you simply throw it in handfuls and use a pool trowel to spread it out.  I don't worry too much about the tool marks yet.  After I stamp I use what's left as inspiration for where to carve, which removes them in the process, works for me.


Once I get a couple batches on the wall I go back and add some texture with stamps.  When I got started doing this I ordered the kit with all kinds of texture rollers, small trowel size hand stamps and larger stamp pads.  I find I really only use a couple of the rollers, an occasional hand stamp and a couple of the larger pads.  Didn't take long for me to pick out my favorites.

The powder substance you see all over is the releasing agent.  It comes in a variety of colors so you could mix it up if you wanted to but I use the standard grey color.  It keeps your stamps from sticking in the mix and affects how the color takes when its times for staining, allowing for some variations.  I end up using quite a bit of the stuff.

Once I've gotten the mix up on the walls I begin to carve the basic outline for the design, using my pool trowel.  If I don't like something I can go back in with the trowel and change it up, the material is workable for quite a while at this point.  You can really do just about anything you want.  I have seen people make really small stones but I am not able to do that, they just fall off the wall.  The suction holding the mix to the wall releases if you mess with it too much and the smaller the stone the less surface area it has to hold it on the wall, that's my excuse anyhow.

I haven't done too much with individual stones, I tend to carve "cliffs" so I'm on a learning curve here.  I completed my third day so far and each day I've learned a little something new to make the next day go a little smoother.

Now that I've got my individual stones marked I go back in with the trowel and start carving away to create some depth differential between the stones.  Be sure to come back in with a hand stamp and give these areas some texture now or you'll forget and it'll be too late (learned that the hard way, it will be alright when it gets some color on it but every time I see it I'll know it was a goof up on my part).

I use another trowel, a tuck pointer, to finish off the carving.  There is a wedge stamp that'll help create the individual stones but I didn't have it the first day so I've been using my little tuck pointer instead.  It works just fine but I'm sure the wedge would speed the process up a wee bit.

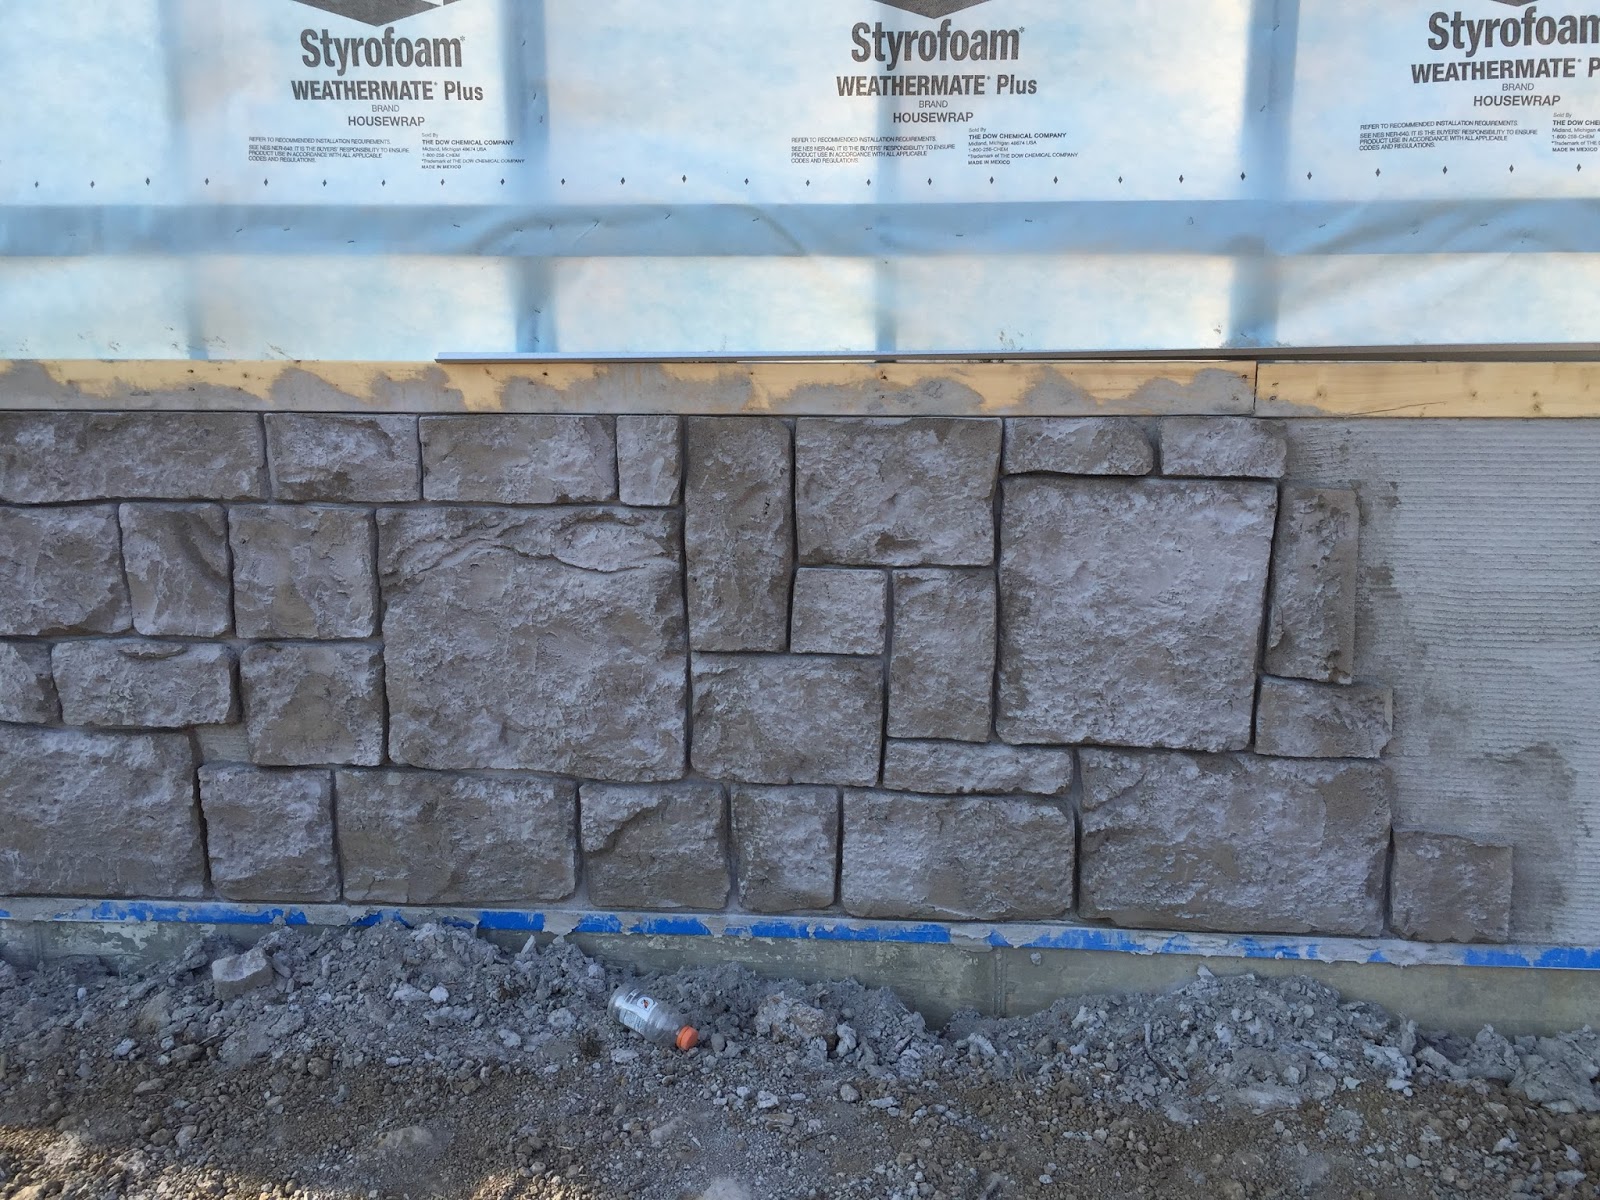
Here's a look at what I got done on day one.


... and two.  

I've managed to get one side of the building completed this week and next week, the other half.  Then its time for staining.

One of my favorite things about this material is how creative you can be.  It'll do a variety of designs and you can get as creative as you'd like.  Here's a look at a few of my other projects using the same mix:

This is a pump house carved to look like a stone facade.

This is a pool surround with a mine entrance and small tunnel.

A waterfall carved like a stone cliff.

A retaining wall carved to look like a cliff wall.

It also has a waterfall...


The tree stump table legs are carved concrete.

This is another retaining wall, the trees are carved concrete.

Lastly, a fireplace carved to look like stacked stone.

I have always wanted to do an art piece and thought maybe I'd get my chance when we finished off the basement, well, that hasn't happened yet, but soon we'll be opening a shop called The Chirping Frog, (an antique & more mall) and I'm thinking of doing one for it.  Stay tuned and I'll let you know how that goes.

If you're looking to see more projects and watch some videos you'll find all kinds of stuff at Vertical Artisans on YouTube or type in "Carved Vertical Concrete" and you'll find a variety of projects to watch.  Really fun stuff.

Wednesday, June 22, 2016

A Peek Inside My Completed Cereal Box Journal

A completed journal and I'm actually using it, how 'bout that!  

Earlier I shared with you how I made the cover for this journal and now I'd like to give you a peek at the interior and how I put it all together.  
I pulled out all my leftover papers, cut them in half and am using them for the pages (I still have the other half so I can make another journal someday).

I want to bind my book with ribbon, I really love that look, so I punched two sets of holes in the spine of my cover and added some grommets to give it a nice clean, finished look (I used a hammer since my crop-a-dile won't reach that far down the spine of the book).

Then with the template I used to poke the holes in the spine I added holes in my pages to form 4 signatures with roughly 8 pages each.  After I got them into the book I started the decorating process, using leftover papers.  Here's a look at some of the pages:


I am using this journal to document the process as we build The Chirping Frog.


I have never been very good at journaling so I am not doing a great job keeping it updated but I am keeping track of the major milestones and adding my own little bits of crazy (you know, frustrations of building and the ramblings of exhaustion when we're in the thick of it).  

I am hoping once we get the mall open to have some classes making a variety of journals, they are so much fun and can be personalized for any occasion or topic.  What do you think, what type of journal would you make and how would you use it?

Tuesday, June 21, 2016

Building The Chirping Frog- Part 15

Another week gone, two really but who's counting (me!) and we're making progress, every little bit gets me closer to my goal of opening The Chirping Frog, an antique and more mall with a variety of antiques, collectibles, vintage, home decor, furniture, artisan wares and repurposed items.  

Here's weekly updates from the beginning if you're interested:

Half the roof is done, the other side is where the air conditioners sit, there's been a slow down to get the curbs built and installed correctly so that they don't leak.  As much as I want things done quickly I also want them done right (as my husband informed me and of course, he's right).

Here's the start of the first curb.  There will be six air conditioners so six curbs, they must get installed and metal flashing fabricated in order to continue with the roof.  


Meanwhile, Jason spent a weekend installing drainage tile around the building, you can see where it sticks up for gutters to dump into.

Some of the wainscoting has been installed.

They also spent some time putting on the hurricane brackets you see here.  Could you just imagine the whole roof flying off and having to start again, that would have been awful.  

A little of the soffit got started as well while waiting for the flashing.  I know it seems a little sporadic but that's how it works.  While waiting for one thing you press on with whatever else you can get done.  It all comes together in the end.


Jason and I worked on prepping the front for the vertical concrete application.  First thing, the metal flashing.

The guys installed a plywood base then Jason and I got the liner and metal lathe installed.

Scratch coat comes next.

Monday we started the concrete application.  I'd forgotten how fun this stuff is to play with.  Jason helps me out for a little while in the morning to get things mixed up and I throw it onto the wall and get it carved.  I can only manage about 6 bags of mix before it becomes un-workable.  What you see below is one bag right after I've thrown it onto the wall and smoothed it out with a trowel.
 

It gets stamped and carved to become what you see below.

It'll take us a couple weeks to get the concrete wainscoting and truss bases done, by then the roof should be done so Jason can put up the pine trusses he made for the front entry.  Its really coming together.  Very exciting!

Tuesday, June 7, 2016

Building The Chirping Frog- Part 14

It has been one of those weeks, I was so excited to get some metal up yet here we sit, no metal, even though its been here for nearly a week.  The rain has put a damper on things and I'm just a tad bit irritated.  Someone is trying to teach me some patience I guess.

Here's a look at the building as it sits right now, the only change from last week is the purlins across the roof (the boards every 2' that the metal attaches to) and the leader board (that's not its technical name?  across the front edge of the hangover at the soffit area, what's that called?)  It is completely ready and begging for metal, come on, let me see some metal, pretty please!


Here's some of the metal, more to come.


On the flip side, we are gearing up and getting ready for the next phase.  Jason and I headed out to Oklahoma, with the dog (that was her first long trip) to pick up cabinetry.   Check these beauties out.  We took the metal with us and the guys spent the evening cutting it out and getting it installed.

If I wasn't chomping at the bit before I really am now.  Can't wait to get them installed.

Crazy dog.  She had way too much fun while the guys worked.  She managed to slip out of her harness (she's channeling Houdini I think), determined to see the cows and goats while I had other plans.  She won!  Once we got her corraled again I tried putting her in the back of the truck in the shade (she won't jump into the backseat yet try to corral her and she'll try just about anything to gain her freedom).  I ended up tightening up her harness and holding onto her all night.  Fun!  Stubborn as a mule!

Although things seem to be moving at a snail's pace, I'm sure it'll pick up soon and before you know it we'll be opening The Chirping Frog, a new antique and more mall with a variety of antiques, collectibles, vintage, home decor, furniture, artisan wares and repurposed items.

Here's weekly updates from the beginning if you're interested:

Next week I will really be a basket case if I don't have some serious progress to share with you. Please, oh please, lets get some work done this week (go away rain).
Related Posts Plugin for WordPress, Blogger...