Tuesday, May 31, 2016

Vertical Carved Concrete Pump House

I have flower beds all throughout the yard. Which, in the heat of summer requires hoses all over the place. I'd like to say "he loves me" and that's why he trenched water lines everywhere to help me keep my flowers alive, but the truth is he was really sick of hoses! I'll take it- watering is so much easier!

Now, to hide the pump, sounds like a good summer project doesn't it? (This project was completed a few summer's ago).

First, we dug out and poured a pad with footings, then the framing begins.

Inner framing is nearly done.

Inner framing and rebar, getting closer.

Ready to pour. Inner framing is done, rebar in place and outer framing with supports is in.

Here's a look from the lake side. Pour in progress.

I won't be doing anything to the top so he's stamping it.

Removing the forms. Almost my turn...

Here's the finished product. Took me a couple days to get it carved and another couple of hours for color.


Someday it'll get a door. Not sure when, but someday!

Now when I want to water all I have to do is flip that little switch and turn on faucets located strategically throughout the yard. (Some still require hoses while others are now hooked to a sprinkler system). Thanks babe- works great!

 In a couple weeks I'll be doing a similar vertical application to "The Chirping Frog", the wainscoting across the front of the building and the piers holding the pine trusses hubby made for the entrance.  Can't wait to get started.  Right now those trusses are loaded up on a trailer waiting to make their grand entrance, also only a couple weeks away.  

Thursday, May 26, 2016

Building The Chirping Frog- Part 12

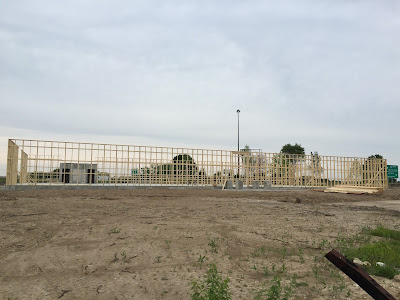
It's been another exciting day around here.  I'm late with this week's post because noticeable change didn't happen till today and I didn't want to have to wait another week to share it.  Trusses are going up and this building is coming together.     

Our newest adventure is moving right along, before you know it we'll be opening The Chirping Frog; an antique, collectibles, vintage, home decor, furniture, artisan wares and more shopping mall.  I'm also planning to host classes in a variety of great topics.  Any artists out there looking to teach a class?  Let's talk.  Here are some links if you're interested in following our progress:

The other half of the building is framed and ready to raise.

 They still have finishing touches but would ya just look at that!  We've got walls.

Some of the finishing touches that still need done before trusses go up.

If you noticed in earlier pictures the large gaps in the framing on either end of the building, that's where we decided to add some windows.  We were having it framed for future overhead doors (just in case, as hubby always says, "we don't plan to fail just fail to plan") so we plopped some windows in there for added light.


The front door, can't wait to get our pine trusses up there!

Would ya look at that, the rain slowed things down a bit but they got some trusses up.


I also spent some time this week, 8 hours one day and about killed myself (between the stench and the aftermath of a sore body) getting the pine trusses and decking stained.  I still have the poles to do but that shouldn't be too bad.  After that I hope to never smell that nasty stuff again.  Its pretty potent.
 

Took an inventory today of my vertical mix supplies and am getting ready to order what I need for the wainscoting and pole supports.  Won't be long now and I'll be sore as can be, again, with concrete burns on my fingers and wishing (for the moment anyhow) that I'd scrapped the wainscoting idea but don't let my temporary whining fool you, I love every minute of it and can't wait to get started.

I'd love to say that next time the trusses will all be up and we'll be moving on to bigger and better things but with the weather forecast and the holiday weekend coming up I think I'd be lying. 

Patience, my dear, all in due time!

Wednesday, May 25, 2016

How to Easily Turn A Tin into Multiple Pieces of Jewelry

I am a hoarder of beautiful tins, I admit it, I can't pass them up.  Many times they're not usable for my purposes but they're beautiful so I must have them.  This particular tin I have found a couple times and it's perfect!  Wait till you see how many projects I've made so far and there's still plenty left to work with.

I forgot to take a picture of the tin before I started cutting but look at all those lovely pieces I have to work with.

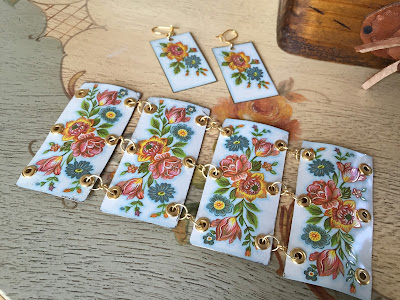
I decided to make a bracelet and earring set for my first project.  I'd love to teach a class at the new shop for this, so easy and you leave with completed jewelry.

I started by cutting down my pieces so they are a better fit on the wrist.  I used the block to hammer them relatively flat (when cutting them up they tend to get bent in the corners, amongst other things).

I used a file to sand down any rough edges and round the corners.  Then, using canned food I hammered each piece giving it a slightly rounded finish, you can see what I mean in the next picture.


I marked the pieces where I wanted the eyelets and started punching holes with my crop-a-dile, love that thing....

 ... and added my eyelets.

Using four of my matching tin pieces I linked them together.   I haven't added the closure yet, I started to make one but the wire just wasn't sturdy enough for my liking so I need to get into Michael's sometime and pick one up.  Also, if I'm teaching this for a class we will have limited time, making closures might not be an option, especially if we're making earrings too.

Of course we are.  Again I used ear wires from Michael's that match the wire and eyelets, making the earrings a really easy project.  Simply prep the smaller pieces of tin with a little sanding, mark and punch your hole and attach your ear wire with a ring.  It's as easy as that and you've got yourself an adorable new bracelet and earring set.


Oh but why stop there?  You could continue on and add a necklace quite simply.  I used a different color piece from the same tin for this project.  Simply cut it out and make random hole punches around the outer edge.  I then took some wire and strung it through the holes, leaving a tail at the bottom on both sides.

I strung a few decorative beads sporadically throughout as well...

... and used the "tails" at the bottom to make a ring to add a little bling.

Another quick project for a class that requires very little jewelry making experience yet you leave with a beautiful pendant necklace that you made yourself.

Friday, May 20, 2016

A Few Ideas to Decorate With Natural Elements

I am a huge fan of bringing the outdoors in!  Here's a few things I found on Pinterest that do just that.

This is about the coolest table I've seen in a long time.  If you follow the link there's an island that is just outstanding as well.
trendir.com
The link above also shares the top book shelf.  I really love the look of the bottom shelving.
pinterest.com


How cute is that?  An easy way to add a natural element to a room.
hative.com
These are so cute.
espritcabane.com
I just love this.  Gorgeous!
pinterest.com
This Etsy shop has all kinds of great wood slice art pieces.
ModernRusticArt on Etsy
Imagine the shadows this adorable light would create.
trusper.com
What a great coffee table.
pinterest.com
Gorgeous!
designsponge.com
I'd break this in a heartbeat but I really like the idea of it.
pinterest.com
Love these.
makezine.com
Art prints using natural elements is another way to bring a little bit of outside, in.
drivenbydecor.com
Most of these examples focus on trees but what about rocks or natural materials.  Here's just a few more great examples:


This is a great fireplace, not every home can handle something like this but how about adding rock in a less massive way....
https://www.pinterest.com/pin/233061349437070669/
Like a backsplash?
The Chirping Frog
Or a rug?
homedit.com/
Another way to bring some natural elements into your decorating is with materials.  Baskets work great.
birchlane.com
or window treatments.
blindsgalore.com

How have you brought natural elements into your home?  
Related Posts Plugin for WordPress, Blogger...