Wednesday, March 16, 2016

Perennials- A Few of My Favorites

I don't know about you but I am a Perennial lover!  I can't get enough of them.  I am not a structured gardener, very informal, and I love when the perennials spread out, intertwine and take over a bed, within reason of course. 


Here's a few of my favorites:

Golden Ragwort, I've only had this one a couple years and it really comes to life in early spring while nothing else is blooming and things are just beginning to fill in with bright yellow flowers lighting up a variety of spots in the garden. 

It spreads out like crazy.  I also love that!  One of my favorite things about perennials is how easily they spread and thrive. 


Russian Sage, every house I've ever had has included this lovely perennial.  It mixes well with a variety of other perennials and with it's wispy, feathery appearance it blends well with other, more structured plants such as purple coneflowers, black-eyed Susan's and Knockout Roses.  Really great combo's. 

After clearing out the debris last fall this is what I've got.  I love how easily it spreads out.  See all those little babies popping up.  All I've got to do is dig them up and plant them somewhere else and I've got a continual supply of new plants. 

Alright, this one's not a perennial but I tend to favor bushes that send out little "babies" as well that I can dig up and plant somewhere else.    This Lilac Bush is the perfect example of just that.  A few others that work for this are Dappled Willow and Little Henry's.  I've got transplants of all of these throughout my yard.

I found little "babies" growing around the outskirts of the bush so I dug them up and planted them.  I lost one but the other is slowly growing in.  It's tiny, but going to bloom beautifully. 

Finally, for today, Purple Coneflowers one of a few natives for my area that I just love.  (Shasta Daisies and Black-Eyed Susan's are wonderful too).  They multiply like crazy, attract birds and bees and they're gorgeous!  What's not to love.

They are a little finicky when it comes to transplanting, they really don't like it, but hang in there.  The parent plant might look dead but just keep watering and be patient.  I can't even tell you how many times I've planted these little buggers only to have the parent plant look dreadful for the rest of the season (and sometimes even die).  Many people want to dig them up and return them but I'm telling you, the next set you plant will probably do the same thing.  Rather than return, keep them watered and give them till the following spring (you usually have a year warranty anyhow so give them time).  I can almost guarantee that you'll have babies that will bloom the next spring.  That's just how they roll!

The largest plant in the following picture is a parent plant, dug up from somewhere else in my yard.  It wilted up and looked horrible after I planted it and for the remainder of that season.  The following year it came back, bloomed beautifully and produced baby plants.  This spring there are babies everywhere and my parent plants have doubled in size.  It's filling in beautifully.  Remember, patience is key, it's not going to happen overnight.

I am so excited for spring and hope I have some time to get out there and get things cleaned up.  I've got a to-do list a mile long but know this is not the year to get any of it accomplished (not with "The Chirping Frog" project").  I do need to carve out some time to do some clean-up.  Do you have any great plans this year for your gardens?

Tuesday, March 15, 2016

12 Gorgeous Decorated Ceilings

We spend so much time decorating our homes, then paint all the ceilings white.  What?  I'm not saying we need to do something different on every ceiling but come on now, lets quit ignoring them and go for the gusto.  The possibilities are endless and what an impact a strategically decorated ceiling can make.  Check out these great examples:

How about paint.....?
http://www.pinterest.com/pin/259590365997486752/
http://braysamlane.blogspot.com/2013/07/basement-remodel-with-painted-exposed.html
http://www.pinterest.com/pin/259590365997486838/

Or a Medallion of some sort......
http://www.pinterest.com/pin/259590365997486832/
http://simpledetailsblog.blogspot.com/2014/02/diy-gold-sunburst-flush-mount-light.html?crlt.pid=camp.VU7Kas2mA9SI

Metal..... love it!
http://www.pinterest.com/pin/259590365997486751/
http://www.southernliving.com/home-garden/decorating/cottage-style-home/metal-ceilings-cottage-style

Wood..... I can't decide which one I like the best....
http://www.pinterest.com/pin/259590365997486739/
http://www.pinterest.com/pin/259590365997486759/

http://www.pinterest.com/pin/259590365997486784/


What about Stencils......?  The Possibilities are Endless....
http://www.pinterest.com/pin/259590365997486755/

http://www.cuttingedgestencils.com/chinoiserie-ceiling-stencils.html
Have you done anything interesting on the ceilings in your home?  Would love to see your handi-work.

Monday, March 14, 2016

How to Make an Animal Pendant Using Tin


While playing with tin, making little book pendants with mom, I started thinking of what else I could make.  For some reason a whale popped into my head but this can easily be converted into another design.                                                                                                                                 The first thing I did was draw my whale and his pieces.  I made the body, a fin and a tail.   I cut out the pieces and marked on the body where I wanted them to fit as well as the connection spots.


Using the paper templates I marked and cut the pieces out of tin, sanding the edges with a file.

Punch holes for connections.

Use rivets to make connections.

I used cardboard packaging as a spacer so I could leave a little room while riveting the tail so that it could move.  Turned out so cute.


I added an eye and an eyelet for hanging.

I wanted to decorate the back in some way so I used pattern paper.  It leaves a very sheer, tissue paper look allowing the gold color of the tin to shine through.  Really pretty and simple finish.

Now, how am I going to use it.  Haven't decided quite yet but it'll become part of a necklace someday.  I'm thinking of other animals that'll work; monkeys, birds, frogs, a butterfly?  What do you think would be cute?  

Thursday, March 10, 2016

Building The Chirping Frog- Part 2

Another week has flown by and we've been working hard trying to get site work done so we can move on to footings and get this building started.  It is really exciting to see how much progress we've made.

On Saturday I was a little depressed, we'd worked all day, my shoulders were throbbing and the rest of my body ached, yet it didn't feel like we'd accomplished much.  Well, it's amazing what a couple more nights of work can do.

Here's a quick reminder of where we started and a look at the progress we've made.

Before:


Monday, February 29, 2016

Building The Chirping Frog- Part 1

I have been dreaming about my own shop for years, but never really pinned down exactly what I wanted to do, until now.

Last week we closed on a piece of commercial property and have begun site work for our newest adventure:  The Chirping Frog, an antique, collectibles, vintage, home decor, furniture, artisan wares and more shopping mall in a great location right off a major interstate.  I also plan to host classes in a variety of fun topics; such as mosaic, hypertufa, jewelry making, paper arts, etc.  I am so excited and a little terrified all at the same time.


Wednesday, February 10, 2016

A Flip Through Of My First Paper Bag Journal

Last week I got to spend some time with my mom, playing with a variety of craft projects.  Boy did we have fun!  Here's one of the many journals I worked on.  This time I made a paper bag journal.  I am really finding this to be one of my favorites.  

The flap, which I've got covered already is a piece of card stock that I've cut slightly smaller than the size of my bag and using score tape, added it into the fold of the paper bag.  (Don't worry, if you can't follow my train of thought, I'll post the best youtube video series that explains the whole process at the end of the post). 

Next I'll be covering the front and back of the paper bag, including a small "pocket" made from the bottom of the bag.  

Here I've got five of the six pages together with their flaps and am picking out coordinating fabrics to finish the base layer of papers.

Once all your papers are in place and your bags and the flaps are all covered, its time to make the binding and your front cover.  I cut my cardstock leaving 3/8" between the pages so I have plenty of room for memorabilia to be added into my journal.

 Now I've got them glued together and have my score tape ready to put in the pages (after I get it attached to my book cover that is).

So here's my finished product, well, almost finished.  I am still debating on a closure.

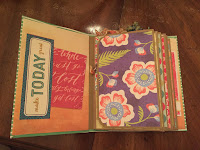
This is the inside of the front cover and the front flap of page 1.  I've added a tri-fold piece of paper for some journaling space in a little tuck spot and left the gorgeous purple paper alone.  I just love the paper.


Open the flap and you've got a small pocket with a tag and a picture mat as well as a larger journaling/picture mat in the bag itself.  Lots of room to add goodies.

The front flap of page 2 and the back of page one with multiple photo mats and lots of journaling space.  Open it up and you've got more photo matting and opportunities to add memorabilia as you see fit.


More journaling space on the back of page 2 and a cute little pocket I made from paper stock on the flap of page 3 with a cute little inspiration tag and room to add whatever strikes your fancy.  Open it up to find more journaling cards (with cute little punched hearts) and photo mats.


I love the use of envelopes, that's the great poppy paper you see on the bag of page 3.  Page 4 begins with a pocket and journaling paper on the front flap.  If you flip over the envelope you'll find a journal spot with cute little punched corners.  


Here's a view of the full layout for page 4.  Multiple tuck points and plenty of photo mats or journaling opportunities.

Page 5 begins with an inspirational card on the flap with plenty more on the inside.


Page 6.  I added some journaling paper on the back of page 5 and left the flap of page 6 alone.  I just love the paper.  When open there's plenty of journaling space and tuck spots for goodies.


The back of page 6 and the back cover.  I used a piece of corrugated cardboard to stamp lines on the paper.  I am really happy with the way it turned out.  On the flap I've added an envelope with a tuck point containing a photo mat.  


Open the envelope and you'll find another journaling spot.

I really love how bright and playful these papers are.  I had so much fun putting this all together.  Such an easy, unique project and a great way to keep track of a special occasion or just day to day life in a fun, artistic way.

Here's the youtube series I mentioned earlier that has wonderful directions for how to make your very own paper bag journal and should answer any and all questions you might have.  This is part 1a (I believe its a 6 part series).  Well worth the watch.

Here's a couple more journals I hope to show you over the next couple weeks.  Except for closures they're done.  The one of the left is bound with ribbon and made from a cereal box.  The blue floral is made in the same fashion as the one above except the papers are sand and sea inspired.

I am also trying to finish up a couple small pendant journals for necklaces.  Can't wait to get them done.  So cute!


So many projects, so little time!
Related Posts Plugin for WordPress, Blogger...