Monday, March 30, 2015

My Landscaping Adventures- 7

This is my attempt to chronicle the progress made around our home when it comes to the yard and my many garden projects, which is a continual work in progress.
 
This week I'd like to show you some of the decorative vertical concrete we've done around the house.  If you've followed along you know I have two ugly retaining walls that  need covered and we poured a firepit that needs a decorative finish.  Today, we'll conquer one of the walls, the firepit and a pump house for the watering system controls.  I am completely enamored with this vertical concrete treatment.  There are so many fun applications.  Hoping to play a little more this summer as I get more of my projects around here done (and begin others, cause I can't get something done before I start ten more things, that's just wrong!)
 
Here are the links to previous articles in case you're interested:
My Landscaping Adventures  Getting started in the front yard and an island of rock
My Landscaping Adventures- 2 The island border and a preview of the back patios
My Landscaping Adventures- 3 Back lower patio, firepit and cantilevered staircase
My Landscaping Adventures- 4 Upper Patio, deck and the beginning of backyard plantings
My Landscaping Adventures- 5 Photos of the planting areas we've talked about so far and the beginning of the large bed out by the road
My Landscaping Adventures- 6 A look at the large flowerbed I've added out front, from a few placed rocks to planted berms and the start of a watering system.
 
 
Here's my monster retaining wall that desperately needs a decorative finish.
 
Let's get started:
All I'd done before this project was a few small practice boards with varying styles of rock to get the hang of it.  I opted to start in this back corner to get a little more practice in where it'd be obscured if need be.  I worked by myself for the most part so small sections at a time;  mixing, throwing and carving is a little much for my wee arms and lack of upper body strength. 
 
Before the carve coat even went on my husband, the boys and I formed up the rock ledges on either side of the waterfall area and a couple more "bump-outs" as well.  We easily mixed up and spread 60 bags of mortar as a scratch coat.  Lots of prep-work before the real fun could even begin.


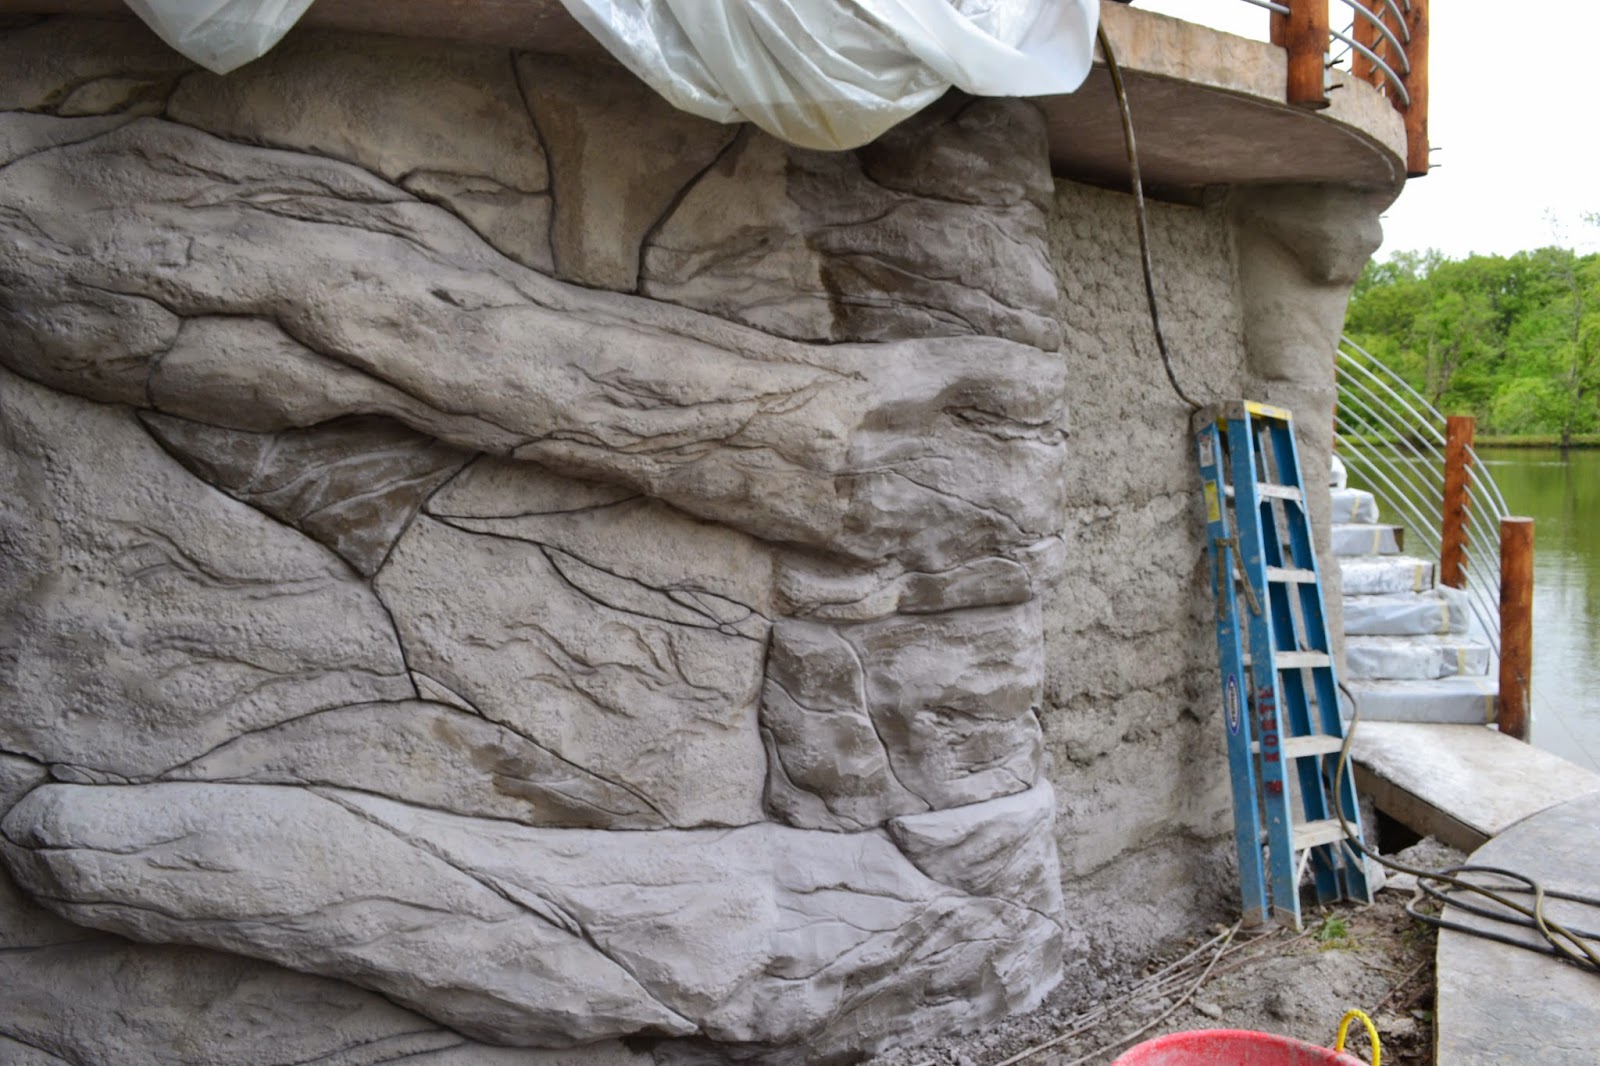
This section under the stairs was a real "joy" to work on.  When I got to the lowest portion I had to be in the water.  Needless to say I spent a lot of time looking around for snakes (there's a large one that hangs out in the rock just to the right of where I stood).  The bass also hunt here, wow, I about jumped out of my boots at one point.  Silly bass.  I was sure the snake was coming to get me.
Now that I've got the carve coat on it's time to add some color.  Here it is all finished up.
 
 
Really happy with how it turned out. 
 
 Next, the little fire pit. 
 First, protect the finished surface underneath and add a scratch coat.


We also added a pump house for the watering system.  To get a full post on the process of building it check out the link, otherwise, here's before and after pertaining to the finishing touch of carved vertical concrete. 

This is how it came out of the forms.
 
And here it is with a carved concrete treatment and some stain.
 
 
Next time, we added a concrete "wood" walkway from the circle drive to the back patio, turned out beautifully, and last fall I completed the second retaining wall.  I'm sure I missed something along the way but that should catch us up, ready for some new projects this season!  Can't wait to share them with you. 

Sunday, March 29, 2015

Art Challenge 2015- Card 10 & 11

Welcome to my Art Challenge 2015.

Do you ever have trouble staying inspired?  It's only week 10 of a 52 week art journal challenge and I'm struggling for inspiration.  I know I can't be alone in this, what do you do when you find yourself sitting at the drawing table and nothing, and I do mean nothing, is coming to ya?  How do you go about getting the creative juices flowing again?

If you've not been following along and would like to see some of my previous week's work, check out the label Art Challenge 2015, you will also see portions of a 21 Day Art Journal Challenge I've been participating in (I'm struggling to finish it as well, the inspiration has left.  I think I'm on day 19 right now).

Week 10
 
 This week we began demolition on a deck that has been leaking for years.  I have construction on the brain so I decided to used strips of paper to "build" a piece of paper which will be the base of this weeks project.  I wove the pieces together and then glued them to another piece for added stability.

I used another larger sheet of paper to turn it over so I could glue it down and cut away the excess around the edges.
 
 Then I played around with a variety of paint colors to add more color and interest, writing "construction can be fun!" to finish it off.
 
 
For the back I wrote out the details of our "deck adventure", used a gloss to keep the ink from smearing too badly and then added some paint over the top,  I am loving playing with the textures I'm able to make with the paints and the background effects but am having trouble layering and creating finished pages.  Practice, practice, I'm hoping that'll come.
I decided to fill in the white area with a little more color.
 
Week 11
 
Irreversibly Moi on Facebook had a post one day talking about using Art for Therapy and it featured a technique using watercolors and white crayon.  I thought I'd give it a try.  It worked, not exactly what I expected but it worked and I can't wait to give it another try.  This week demolition is done and building is about to begin.  This is my interpretation of the new deck.  I drew the shape out in crayon and then used watercolors to add some color, with a gloss over the top.

Then, for the back I copied my husbands scale drawing of the project and glued it on, extending what was left onto the front surface.
 Here's my hubby's scale drawing, copied and glued to the back with a layer of gloss over the top.
 I then came in with water and acrylics to add some color.  I used a mix of acrylics and gloss which allowed me to write in it, "let the fun begin".  We always have a project, every year and it's always a learning experience for me and an extreme test of patient and perseverance for my husband (considering his only helper these days is "moi", poor guy). 
 
I am still one week behind, imagine that!  Hoping to get caught up this week.  I'd also like to complete the 21 day Art Journal Challenge as well.
 
 
Here's a couple links to earlier work on the 21 Day Art Journaling Challenge:
 
Day 15- I Am
 
For this challenge I started with a picture of myself that I cut and pasted down then began layering color.  I couldn't help but think that more often than not what we think of ourselves doesn't line up with what others think when they look at us.  That's the primary thought for today's page.  "What do you see when you look at me?"
 
 
Day 16- Home Is Where The Heart Is
 
I'm sure if I lost everything material in my life I'd be surprised by the things I'd miss but more than anything it's the people in my life that make it home.  We built our house 8 years ago with the boys (at about the age pictured) and the memories are absolutely priceless.
 
 I didn't want our pictures completely "out there" so I opted to fade them out but I went a little overboard.  This is easily my least favorite of all the completed pages. 
 
Day 17- Kitchen Kapers
 
The recipe for a happy life!  This is my mixing bowl with all the ingredients necessary for happiness.  It's really all in the attitude I think.
 
Day 18- Mandala
 
 
 Hopefully over this next week I can get caught up with both challenges, complete the 21 day challenge and catch up with my weekly cards.  Come on inspiration, come back to me! 
 
I haven't been feeling good, not a lot of energy so I've not been able to get a lot done and my to-do list is piling up, I think that's a lot of my problem.  I am getting overwhelmed with everyday that passes and I can't get anything done, very frustrating.  Now, not having enough energy to do much is the perfect opportunity to sit and play with "art", you'd think, but I can't get that pesky to-do list off my mind enough to be creative! 
 
It'll all get done, eventually, right?
 

Saturday, March 28, 2015

Easy Floor To Ceiling Window Panels

Just like putting on a piece of statement jewelry to complete your outfit, window treatments do the same thing for your room, the perfect finishing touch.  They can set the mood, hide or enhance architectural details, lend a sense of balance or simply block out light. 

I love the way long, flowy panels add a sense of elegance and grandeur, drawing the eye upward and expanding the sense of space.  The perfect statement piece for any room.

Years ago I made these "faux" puddle panels you see at right and below for a client who found this style in a show home and wanted hers made to match.  Really simple to make and even easier to hang for decorative panels..  All you need are inexpensive wide metal rods from your local hardware store or Wally World (one per panel) add a pocket to shir each panel onto a rod cut down to size and  hang.  Easy Peasy!

To create the "faux" puddle simply form a pocket in your hem and run a string through it, add a screw or hook into the wall and hang the string.  Perfect for homes with little ones, or pets that tend to mess with the fabric puddled on the floor. 

My most recent client loves this look and has picked her fabric.  Today is hanging day, always an exciting day!

This is the before picture.  The time of day is awful for pictures, lots of glare (even with trying to close the blinds), I took everything from an angle.  I'll be back over there in a couple weeks to hang Kitchen and Formal Living Room panels so hoping to get some better, straight-on pictures then.
 
Here they are after hanging.  It's amazing the difference adding some fabric to the windows can have.  It immediately softens and richens the space.  These are also hung using inexpensive, wide metal rods from Wal-Mart.  Each panel is one width of fabric, lined with a pocket at the top to accept a rod.  I cut the rods down to 14 inches.  I left a pocket in the bottom for the "faux" puddle but the client opted to leave them puddling.  To help keep them in place I told her to get some rock and add weight at the bottom.  No one will ever see it and it'll add enough weight to keep them in place exactly how she wants them!
 
I will be working on Panels for the Kitchen and a formal Living Room next.  I will try and take some pictures of the process to give you a better idea of how I go about making and getting this style of treatment hung.  It really is a simple, no-nonsense way of adding some pizzazz to any room.
 
In the meantime, have you made any window treatments?  Would love to see your finished results.  Any hints or tips to share with us? 

Thursday, March 26, 2015

Tile-Work Ideas

Have you ever done any tile work?  I did a couple mosaic tabletops before we built our first house and then jumped headfirst into all the tilework, including mud/laundry room floors, kitchen backsplash, boys bathroom floor and shower surround and the master bath floor and walls.  It's really not that hard and it's pretty fun.  You can be as creative as you'd like, use your imagination and have some fun!

Worst part, knees!  Has a way of making you feel much older than you are, that's for sure!  Highly recommend the knee pads.  You'll look like a dork but save the knees!


This first picture is the Master Bathroom floor.  I called it "A River Runs Through it" and started by putting in the "river".

Then, I added the mosaic edge, my husband was nervous he'd cut his feet on the broken tile edges but it's been 8 years and no cuts.  I used a board to help with level and kept running my hands over it to double check,  didn't want to hear about that for the rest of my life.

I had to add this one,  I CAN multi-task, who knew!  Now I have some proof.
 
I could of gone hog-wild on this floor but my husband is very conservative so I kept it tame, I still like it. 
This is the finished bathroom. 

 
A few years after we built our house a piece of property came up for sale right down the street.  We needed a project, so we bought it and built a spec house, lots of tile work. 

Here's a few tips and ideas from that experience:

You don't have to spend the earth to get amazing results.  I bought my tile at multiple stores right off the shelf without spending more than $2/sq. ft. and often times much less.   I focused on basic, neutral tiles with some interest in their pattern and then added higher end accent pieces, you get more bang for your buck that way!
 
I also used the same basic tiles in multiple spaces throughout the house for consistency, helps to make it "flow".  This is the laundry/mud room.  It has multiple angles in the room so no matter how I lay the tile it's not gonna be "straight" so I went with it, laid it on the diagonal off the kitchen entry.
 
A simple backsplash in the kitchen, for less than $200 it adds a fantastic finishing touch.
 
This is the hall bath,  I did no accent in the bathtub just a simple surround but I love the floor.  I was nervous to do dark tile with a light grout but I highly recommend it, the contrast is wonderful.
 
This is the master bathroom, I spent lots of time in this room and am in love with the results.  I started with the floor.  This is the same tile that was used in the laundry room.  I simply added a small inset to make a design from a larger 12" square mosaic tile.  For relatively small expense it makes a great impact.
 
We also tiled the shower, this is "in the works".  Again, simple manipulation of the design to make a greater impact without breaking the bank (same wall tile used in the hall bath FYI).
 
The finished design, still using minimal amounts of the expensive mosaic tile yet making a great impact.
 
In this picture you can really see the finished product with all the little details such as:  I really don't like using the granite backsplash that matches the countertops, too matchy-matchy so I always tile that area.  To add a little more design I also ran one layer of decorative tile to finish it off, if you look closely in the left mirror you can see the tub surround is finished in the same manner, just a simple finishing touch.
 
 
If I can do it, anyone can, it's just a matter of jumping in and getting started.  Buy a book, watch some U-Tube Videos, with a little prep work and some time you can add your own distinct style and creative flair to your home for much less than hiring it out.    

Saturday, March 21, 2015

My Landscaping Adventures- 6

This is my attempt to chronicle the progress made around our home when it comes to the yard and my many garden projects, which is a continual work in progress.
 
.   When we bought the land where we now live I always knew I wanted a "botanical garden" feel around the yard and lake.  Slowly, over time (lots of time) it's coming together.  I've had a vision for the front of the property, granted, it's changed somewhat and continues to evolve over time, but a vision none-the-less. 
 

Here are the links to previous articles in case you're interested:
My Landscaping Adventures  Getting started in the front yard and an island of rock
My Landscaping Adventures- 2 The island border and a preview of the back patios
My Landscaping Adventures- 3 Back lower patio, firepit and cantilevered staircase
My Landscaping Adventures- 4 Upper Patio, deck and the beginning of backyard plantings
My Landscaping Adventures- 5 Photos of the planting areas we've talked about so far and the beginning of the large bed out by the road.

This entire area was overgrown and full of junk trees and vines, ugh!  My hubby took the bobcat and ripped most of it out.  I spent two days running a burn pile to get rid of it.  We had a few large rocks left over from another project (phase 1) so I had him place them around out here and that was the extent of this years work (this front bed has been "years in the making").

The following year we added berms, one large closest to the driveway and two smaller opposite of it.  This area measures roughly 90' x 50' and I plan to cover it in it's entirety with flower bed, someday!  Here's the end result of another year's work:

 
Year three, structure.  Well, in the berms anyhow.  I added some trees and shrubs.  I love natural, perennials mixed with structure and I tend to let them take over (within reason anyhow) so I always have babies that need removed, they have a new home out here.  I got it mulched too, lots of mulch! 


Year four, My husband decided he couldn't take another year of hoses from the house out to the flower beds, so,  I got a watering system this year.  The boys and my husband dug trenches all over the yard and hooked it up to a pump system taking water from the lake, works great!  I also added a few bushes to connect the two smaller berms.

 
Now, it's amazing what a couple years can do, it's overgrown.  I have a path through the center planned that'll lead between two "activity" circles (hoping to get that started this spring).  I have started them both but completion will have to wait.  I've also added some rock to the bushes above to make mowing a little easier.  Another year gone. 


This is one of the "activity circles".  It will be a willow structure once the willows decide to grow in and I can start weaving them together, not sure how it's going to turn out but whatever happens I will "make it work". 


This is the second "activity circle",  all I've got so far are the arborvitae that will be on either side of the entrances.  I plan to form the rest of the circle with lavender, in the spring.  I am planning a mosaic walkway to connect this area to the willow structure on the other end.  hopefully that can get started here soon.


I have an art wall I'd love to do out here with bottles that I've been collecting for a couple years (they've taken over the shed and a portion of the garage) and of course the walkway, who knows what direction it'll take in the years to come but it certainly is fun figuring it all out!
 
Do you have any grand plans for spring?  Any fun projects planned?  I'd love to hear about them.
Next time, I've got some vertical concrete to share with you.  Just realized I left all that out.  Wait till you see what I did with a large s-shaped retaining wall in our backyard and how I finished off the firepit.  Fun, fun.  See ya next time!
Related Posts Plugin for WordPress, Blogger...