The finish needed some refreshing and there are some bad spots on top where the veneer is peeling, other than that is seems to be in great shape. I love the lines and feel of the piece.
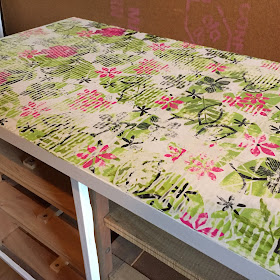
First things first, I painted the frame white. I love the look of two-tone furniture so I am leaving the drawer fronts wood. Now, what to do with the bad veneer on top. I know, decoupage!
I did some research, so many conflicting thoughts on the best practices so I just jumped in and did it. It was pretty thick paper, it stuck great, but wanted to wrinkle. Now, with wallpaper, most all that wrinkling dries out (at least I've come to tell the difference between those that dry out and those that don't). Not really the case with decoupage. I used the roller to squish out the air bubbles but no matter what that paper wanted to wrinkle up in an interesting way. Not all haphazard like you'd expect, but linear, straight lines. How weird is that? Maybe it's not weird and I'm just inexperienced. That could also be true. Anyhow, I got the top and sides done and left it to dry.
I plan to sell the piece (maybe, I LOVE it) so I thought I'd tone it down a little bit with a good sanding. Worked like a charm.
You can see what I mean about the wrinkling.
I also "refreshed" the wood. Simple process where I give them a quick sanding and add some stain. Amazing how much better they look (the pictures really don't do it justice). What a simple fix to get a rich, new finish.
 |
| Before refreshing |
 |
| After Refreshing Here it is all put back together. I am still selling it but gotta say, it gets a short period of time and if it hasn't sold its coming back home with me. I LOVE it! |


Like you, I love the lines of this piece. Reminds me of like a 60's look? To neat. The wrinkle comes into play if your paper is a thin sheet. Also I found that it is best to not only cover the paper with the Mod Podge but the piece of furniture also. Then let it dry before putting anymore on the top. Its a process and you will get the hang of it as you go. Great job by the way.
ReplyDelete