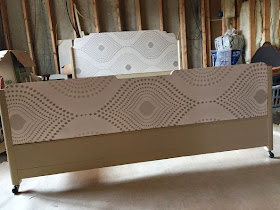
I had over a dozen patterns to choose from with a variety of color selections. Decisions, decisions! I finally narrowed it down to two, and the winner is Tia (pattern # 97461) in the color Dove.
Now, what am I going to do with it?
Initially my thought was to build a headboard. I drew out a plan and everything but the more I thought about it the more I decided that kind of defeats the purpose of the challenge for me. I wanted to make it more of a "use what you have" challenge (and it saved me well over $100 in wood to make what I envisioned, that helped me change my mind as well).
So, instead, I raided my stash and chose a project that "spoke" to me. This cute, 50's Art Deco Style Bed jumped out at me so I got to work and started planning my attack!
First thing I did was play with the wallpaper and make some decisions about how I wanted it to appear on the bed. The paper itself is gorgeous, with a very textural, woven appearance, it's extremely thick and has just enough sparkle to give it a wonderful shine when the light catches it just right.
I hung this the way I would a wall, leaving inches on either end and cutting off excess once I had it up (FYI, with thicker paper its easier to cut it down to exact size first). I found the center of the pattern and cut it to length, marking the center to match up with the mark I'd already made on the center of the bed and using the top of the bed for level.
I have never hung paper without "booking" it first. (Booking is where you apply glue to the paper, fold the glued sides down on themselves and allow it to sit for about five minutes before you hang, it activates pre-glued papers and changes the texture of the paper making it a little more malleable, more easily ripped, and also makes for a fairly messy hang).
This paper is a "paste the wall" product and you're advised not to get any glue on the front. If you've hung paper before, especially with "booking", you know that's darn near impossible. Well, not so with "pasting the wall". Very clean process (well, I'm messy and still wiped glue all over my pants, but that's just me).
I did do a sample to try and show you why you don't want glue on the front but it doesn't show up very well in the photos. Suffice it to say you WILL see the glue on the front. It's got a different sheen and texture and it WILL stick out like a sore thumb on your finished product. Normally when I hang I keep a bucket of soapy water and clean rags handy, wiping off the glue as I go. There's always glue everywhere. Even then, if you're not careful and change the water and rag frequently you'll still see evidence of glue when all is dried (won't notice it till it dries and its too late so frequently change water and rags please).
Thankfully, this process of "paste the wall" completely rids you of such a time wasting and messy process. Its kind of great!
I have enough left-overs to play around with and have a couple ideas in mind of how to use them.
The paper was easy to use (love the "paste the wall" process), high quality and an over-all beautiful product. For a variety of patterns, murals and a wallpaper calculator to help you figure quantities visit their website at www.wallsrepublic.com.
I really wish I had a room right now that I could use it in but the boys (who both have full beds) say it's too girly. I have a spare room but it's not done yet (it looks only slightly better than the framed walls you see here in the background). Hopefully when we get that done I can use it and get some pictures of it all dolled up.
Have you hung wallpaper before? Any hints or tips for newbies? We'd love to be inspired by some of your amazing projects if you'd like to share in the comments.
#Wall sRepublic


How far did you go on the backside of both pieces with the wallpaper?
ReplyDelete