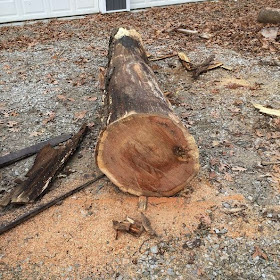
This is what we started out with. It's roughly 10' long. First thing was to cut it in half giving us two 5' lengths to work with.
If you look closely you can see two blue chalk lines. That's where he'd like to cut. That'll give us one central piece and two outside edges. I'm thinking a table for the center cut and benches for the outer pieces.
The goal was to stand this piece up to cut but the Bobcat died on us (we are still working on getting it started again) and between the two of us (him mainly) we could not get this lifted up. Not happening, so we wedged pieces of 2x4 underneath to raise it up for cutting.
One side off.
Now, with one edge off we were able to get it standing. You can see the other blue cut line.
Both sides off. This is the central piece that would make one heck of a chunky table. I might make it a bench also but either way I want it to have concrete legs. It has such a great clean look and I love the look of concrete and wood together.
He cut at an angle to chunk out a piece on the top of these two smaller logs roughly 18" in length to set the top into. Worked really well.
For Christmas, my wonderful hubby bought me a planer and belt sander. We spent one of the next days outside working on them. Can you believe in Illinois it was warm enough to do such a thing?
Look how rough they were to start and how nice and smooth the planer makes them. It took a couple passes but they did great!
I read the directions before beginning and they mentioned adding extra wood to the end of the piece so that when you finish each run you finish on a spare piece of wood rather than your finish piece. Yeah, well, I read the directions, just didn't follow them to the letter. This is what happens! See that divet. If you're careful and apply pressure correctly you can keep it from happening but every once in a while I'd screw up and get that! No worries, it sands out.
What a great tool. I love my new planer. Can't wait to play with it some more.
The belt sander worked great too!
Here is how we left things. We need to check moisture before we move on. Hoping to do that real quick. I've got two center pieces that I'd like to turn into tables ready to go. They're planed, just need sanded. Spring can't come soon enough. Can't wait to show you the finished products!


Wow, that looks awesome! I like it so much. We had a smallish tree go down this winter in the wind. I will have to check out the possibilities. How long do they need to dry out? Ours is a dead tree anyway. The wood is ash and my neighbor make furniture from his. There is any old walnut down to but that may be hard to work with? Gotta go dust off my old planer! You are inspiring!
ReplyDeleteThank you for the kind words. My husband threw around a number of 19% for moisture content. Haven't researched that quite yet. He's supposed to be borrowing a moisture reader from work. My FIL does a lot of woodworking and said "test it", but couldn't remember the numbers.
ReplyDeleteI just found a company for sealing of decks that says it should be 15% or less. I am so excited to get back to working on these pieces, especially the tables. Hoping to get the tester soon so I can get back to work. The weather is even cooperating around here (for now anyhow). If you do something with your downed tree post some pictures. Would love to see what you do.